The show timer with a rundown for stage, control room and crew – it shows the time and, if you want, controls your switcher, Stream Deck, QLab and PowerPoint right along with it.
BeZi Timer is a desktop app for Windows and macOS that runs the timing of an event. You build a rundown from items with title, speaker, duration and planned time, load an item and press Start. The big remaining time runs in the control window, on the stage monitor, on the crew’s tablets and phones and on hardware displays in the hall – all of them show the same number, at the same moment.
The problem the app solves: at conferences, galas, streams and corporate events, time calls, stage, control room, lighting, video and audio all depend on a plan that keeps shifting. Instead of someone reading slips of paper and giving signals, the timer works with what is actually happening: if an item runs long, all following start times shift immediately, the deviation from the planned time shows in every row, and the speaker gets a message in yellow or red on their monitor with one click.
In live operation the timer feels calm and predictable. The switches are always in the same place, risky clicks like Reset or delete require a second click, and the automation – everything the timer sends out on its own – has its own master switch, which stays off while you talk through the plan. That way the control room can rehearse without the switcher cutting at every rehearsal start.
If you like, you can connect the timer to your gear: ATEM video switcher, Bitfocus Companion and Stream Deck, QLab, HyperDeck, PowerPoint, OSC and HTTP. From a single item you can then, for example, put the camera on preview when the item loads, on program at start and bring up a message two minutes before the end. A built-in web server delivers crew views for any browser on the network, a local AI reads existing rundowns from Word, Excel and PDF, and after the show you have a log with the real times.
6Browser views for crew and clients: stage, backstage, rundown, clock, custom dashboard and control page
6Triggers per item: on load, start, pause, at remaining time, at 0, on leave
2Systems: Windows and macOS, interface in German and English
Who is it for?
Event technicians and show callers who run a show live and need to show every department the same time.
Control room and video switcher operators who prepare camera changes and graphics on the item instead of timing every change by hand.
Hosts and speaker support who send speakers cues (“Please wrap up”) to their monitor with one click, in three levels of urgency.
Stage managers and backstage crew who want to see the countdown, the next item and the delay against the plan on a tablet or smart TV, without installing anything.
Live streaming teams who tie the timer, ATEM, HyperDeck and Companion buttons together with a single plan.
Conference and congress organizers with long, multi-day plans who work in blocks (morning, afternoon, day 2) and import plans from Word, Excel or PDF.
Theater, trade show and corporate events with presentations, where PowerPoint, video playback and lighting should run in time with the plan.
People looking for an Irisdown-compatible timer for Stream Deck and Interspace displays who want a more convenient rundown.
Download
Loading …
Quick start
Install the appOn Windows you run the downloaded setup file; it installs without administrator rights and starts the app afterward by itself. You confirm a SmartScreen warning with “More info” and “Run anyway”. On macOS you drag the app from the DMG into the Applications folder and remove the quarantine flag once with the Terminal command from the release instructions.
Fill the rundownSimply drag an existing plan (Word, Excel, PDF, text) into the window – a local AI extracts the items and times and shows you a preview first. Alternatively, you create items via “+ Add” or import a CSV file via the File menu.
Check duration and planned timeEnter the duration for each item as mm, mm:ss or hh:mm:ss and, if needed, the planned time as a time of day (HH:MM). The “Auto” checkbox moves on to the next item by itself at zero.
Open the stage displayIn the “Displays” tab you click “Display window”, choose the monitor and use “move there” to push the window onto the stage monitor. Double-clicking the window or pressing the F key switches to fullscreen.
Invite the crewIn the same tab, the “Crew views” card shows the links to stage, backstage, rundown, clock and dashboard for each network. Tablets or phones open the link in the browser or scan the QR code – nothing needs to be installed.
Run the first itemClick “GO” in the row, or load the item with “load” and start it with Start or Space. “next »” (N key) takes you to the next item, and with the Jog buttons you shift the running time by 10 seconds or one minute.
Send a message to the stageIn the “Live” tab you type a message, choose the urgency “normal”, “urgent” or “immediate” and press Enter. The M key or “delete” removes it again.
Connect your gear (optional)In the “Connections” tab you click “Search network”: the timer finds ATEM switchers, HyperDecks, QLab, Companion and PowerPoint computers and enters the address after you click “Add”. For the Stream Deck, you download the Companion module in the Companion card.
Set up automation and macros (optional)On the item, you attach functions with a trigger under ⋮ → “+ Connection”; in the “Macros” tab you build your own sequences. For them to run during the show, you arm the “Automation” switch at the top (second click to confirm).
Review after the showIn the “Live” tab, the show log lists every item that ran with start time, actual duration and deviation. “Export CSV” saves the table for the debrief.
The header: time and transport
The most important things always sit at the top of the main window: the large remaining time, the state, Start, Pause, Reset, Jog and the master switch for Automation. The elements stay in fixed places whether it shows 05:00, −07:19, 1:00:00 or the clock – long time formats get smaller instead of wider.
The header: remaining time, transport, Jog, Automation switch and stage display switch in fixed places.
Large remaining time with warning colors
Shows the remaining time of the loaded item as mm:ss, as h:mm:ss from one hour upward, and with a minus sign in overtime. The color is green, turns yellow at the threshold you set (default 5 minutes), red shortly before zero (default 1 minute) and flashes red in overtime. A bar below shows the progress of the item.
Turn off flashing: clear the “Blink in overtime” checkbox.
Tip: If you run an item as a count-up, the number shows the elapsed time, but the warning colors still follow the remaining time.
State, title and “Finishes at / Plan”
Next to the time you see the state (ready, running, paused, external), the title of the loaded item and – as soon as the rundown has planned times – a line showing what time the running item ends and whether you are ahead of or behind the plan.
Nothing to set up: the line appears as soon as the rundown has planned times.
Start, Pause and Reset
Start starts the timer, Pause holds it, Reset restores the full duration of the item. For safety, Reset needs a second click: the button shows “really?” and waits briefly for confirmation.
Toggle Start/Pause: Space (when no input field is active).
Reset: click the “Reset” button twice within about two seconds.
Jog – shift the time while it runs
Shifts the running time by −1:00, −0:10, +0:10 or +1:00 – even while the timer is running. This lets you shorten or extend on the fly without touching the rundown.
Click one of the four Jog buttons in the header.
By keyboard: left arrow key = −10 s, right arrow key = +10 s.
Quick select for fixed durations
A row of buttons loads a fixed duration into the timer with one click, without using the rundown – meant for breaks, interviews or ad-hoc times. By default 1, 5, 10, 15, 30 minutes and 1:00:00 are set.
Click loads the duration, Shift+click loads and starts immediately.
Change values: Settings (gear icon) → “Timer quick select”, comma-separated as mm, mm:ss or hh:mm:ss.
Switch the stage display
The labeled “Stage” switch determines what the stage monitor and all crew displays show: timer, clock, a black screen or the test pattern for calibrating. It also follows the keys and remote control, so it always shows the real state.
Click Timer, Clock, Black or Test pattern.
By keyboard: C switches between clock and timer, B between black and timer.
The “Automation” master switch
The switch next to Start decides whether the triggers on the items (macros, ATEM source, QLab, PowerPoint, etc.) actually send anything out. When off, it is dimmed; when armed, it glows amber. Macros triggered by hand always run – Automation only affects what the rundown triggers on its own.
Turn on: click the switch, then click again to confirm.
Turn off: one click, takes effect immediately and also stops macros that are still waiting.
Tip: When you talk through the rundown, leave Automation off. While it is off, every affected item shows a note with an “Arm” button, and the log reports what was skipped.
Three views of the main window
The window can be switched between “Rundown only”, “Split” (draggable divider) and “Side panel only”. In the full views, a narrow strip remains at the edge: the tabs on the right, and on the left the running item with buttons for back and next. Your choice is remembered.
Switch at the top right in the second header row, Ctrl+1/2/3 (Mac: ⌘+1/2/3) or the “View” menu.
Width of the right column: drag the divider, fine-tune with the arrow keys, double-click to reset to the default width of 360 px. If you drag it far past the edge, the full view snaps in.
The rundown always keeps at least 700 px; the window cannot be dragged narrower than 1100 px.
Notice banners in the header
When a message is currently on the display, a banner with its text appears in the header – you see in the control window what the stage sees. A second banner warns in red when, for example, an external time source drops out or the ATEM is sending something other than what the running item calls for.
Nothing to set up; the banners appear and disappear on their own.
Protection against quitting by accident
While the timer is running, the app asks before quitting, because quitting also closes the stage display and disconnects all crew views. If the timer is stopped or paused, the app closes without asking.
Close the window or quit the app and confirm or cancel the prompt.
The Live tab
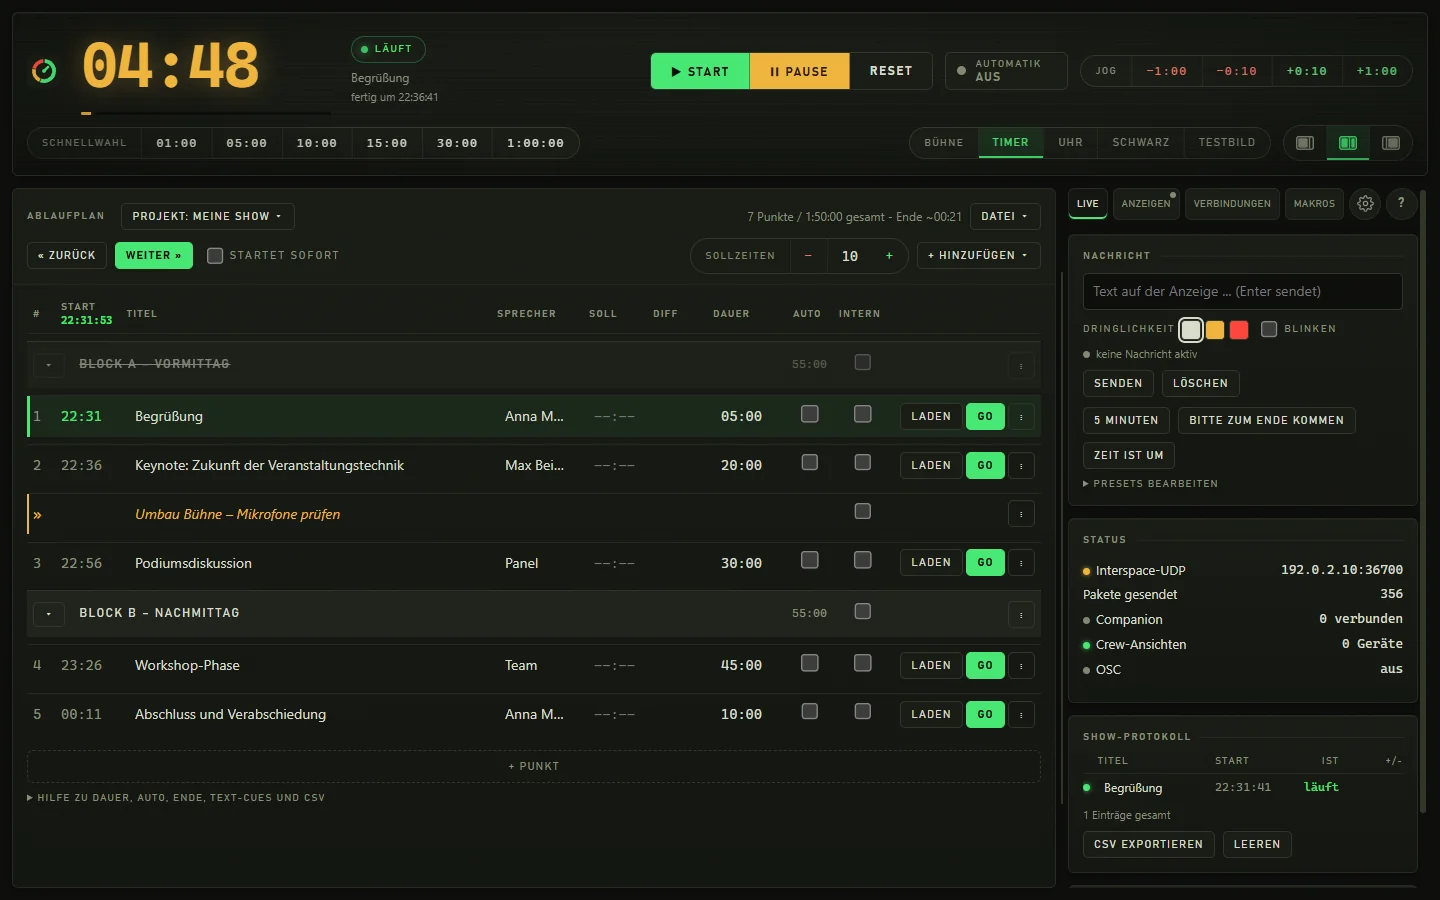
Everything you need during the show is in the “Live” tab: messages to the stage, macro buttons, the state of all outputs and the system log. With plenty of space, the cards line up side by side.
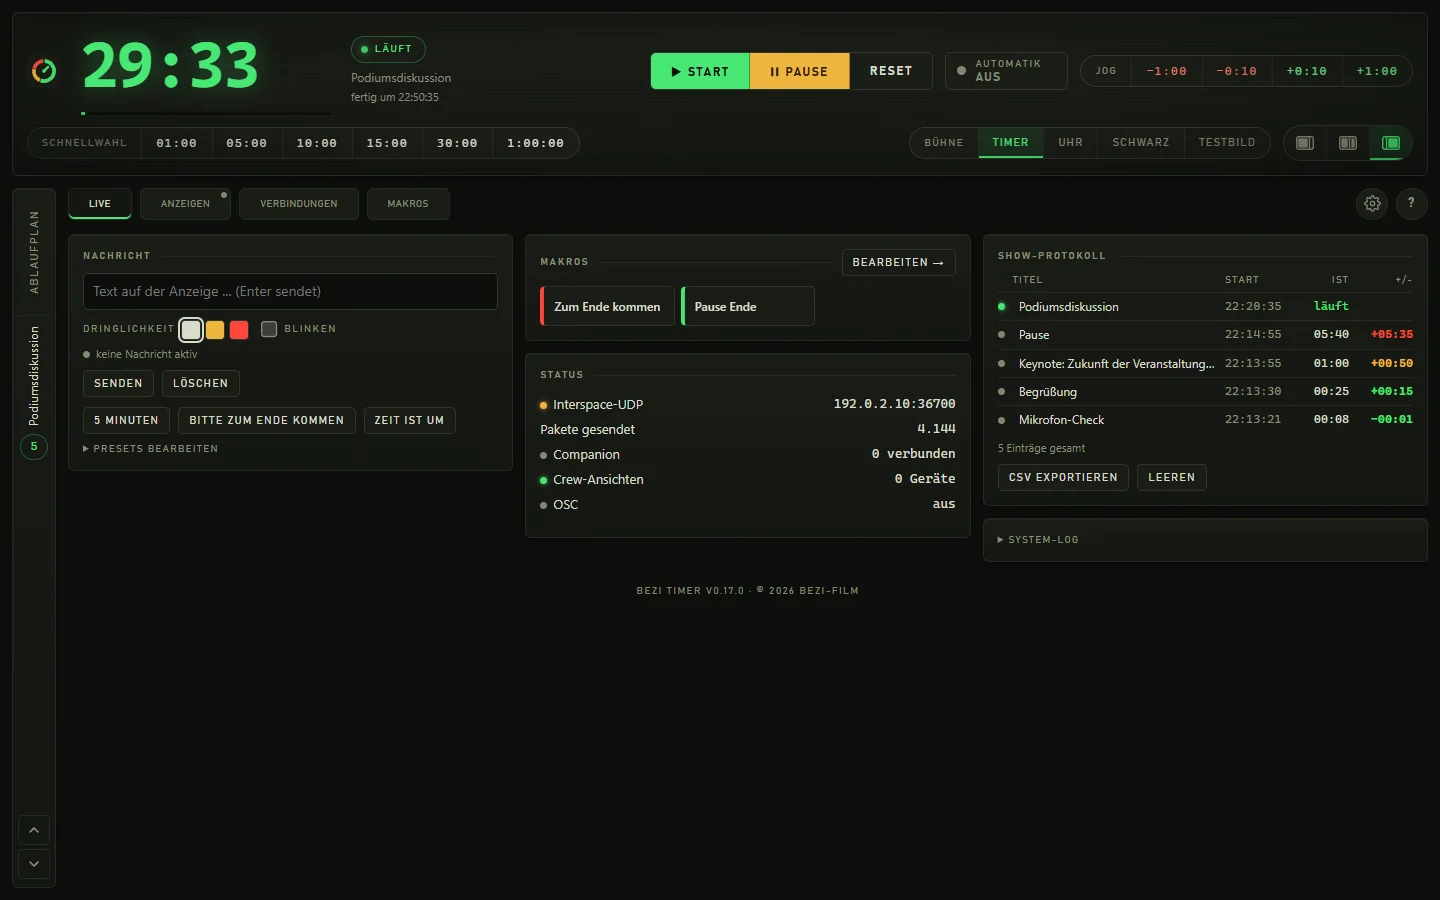
Live operation: running timer, rundown on the left, message, status and show log on the right.
Message to all displays
Sends a text to the stage monitor, backstage, dashboard and Interspace displays. A preview next to the field shows beforehand what will arrive, and a status note below shows whether a message is currently active.
Type text into the field and press Enter or click “send”.
Clear: “delete” or the M key.
Urgency and blinking
Three levels are enough so nobody has to think long in an emergency: normal, urgent (amber) and immediate (red). The message can also blink. Stage, backstage and the custom dashboard show it in that color.
Click one of the three color dots next to the text field, optionally check “blink”.
Message presets with one click
Three one-click messages are ready as buttons; by default “5 minutes”, “Please wrap up” and “Time is up”. The active text lights up, and a second click clears it again.
Click a button to send, click again to clear.
Your own texts: expand “Edit presets” and change the three fields – they belong to the project.
Macro buttons
Macros with “as a button in the Live tab” checked appear here as large buttons in their color. One click runs all steps in order – always, even when Automation is not armed. While a macro is running, the button shows the progress, and a square next to it cancels it.
Click the button to trigger, ■ to cancel, “edit →” jumps to the Macros tab.
Status card
The live state of the outputs at a glance: Interspace UDP with target and packet counter, number of connected Companion clients, number of crew devices and the OSC state. An error while sending UDP appears directly below.
Display only; settings are in “Displays” and “Connections”.
PowerPoint card
With a PowerPoint connection set up, the slide number and manual controls appear here (see the PowerPoint section).
Create the connection under Connections → “+ Add connection” → PowerPoint.
System log
Technical messages from the app: connections, imports, errors, triggered and skipped automation actions. If a port can’t be opened, the log gives the reason, and on Windows also a note about reserved port ranges. Timestamps are in local time.
Expand “System log”.
Tip: You don’t need it in normal operation – but when you ask “Why is nothing happening?”, it is the first place to look.
The rundown
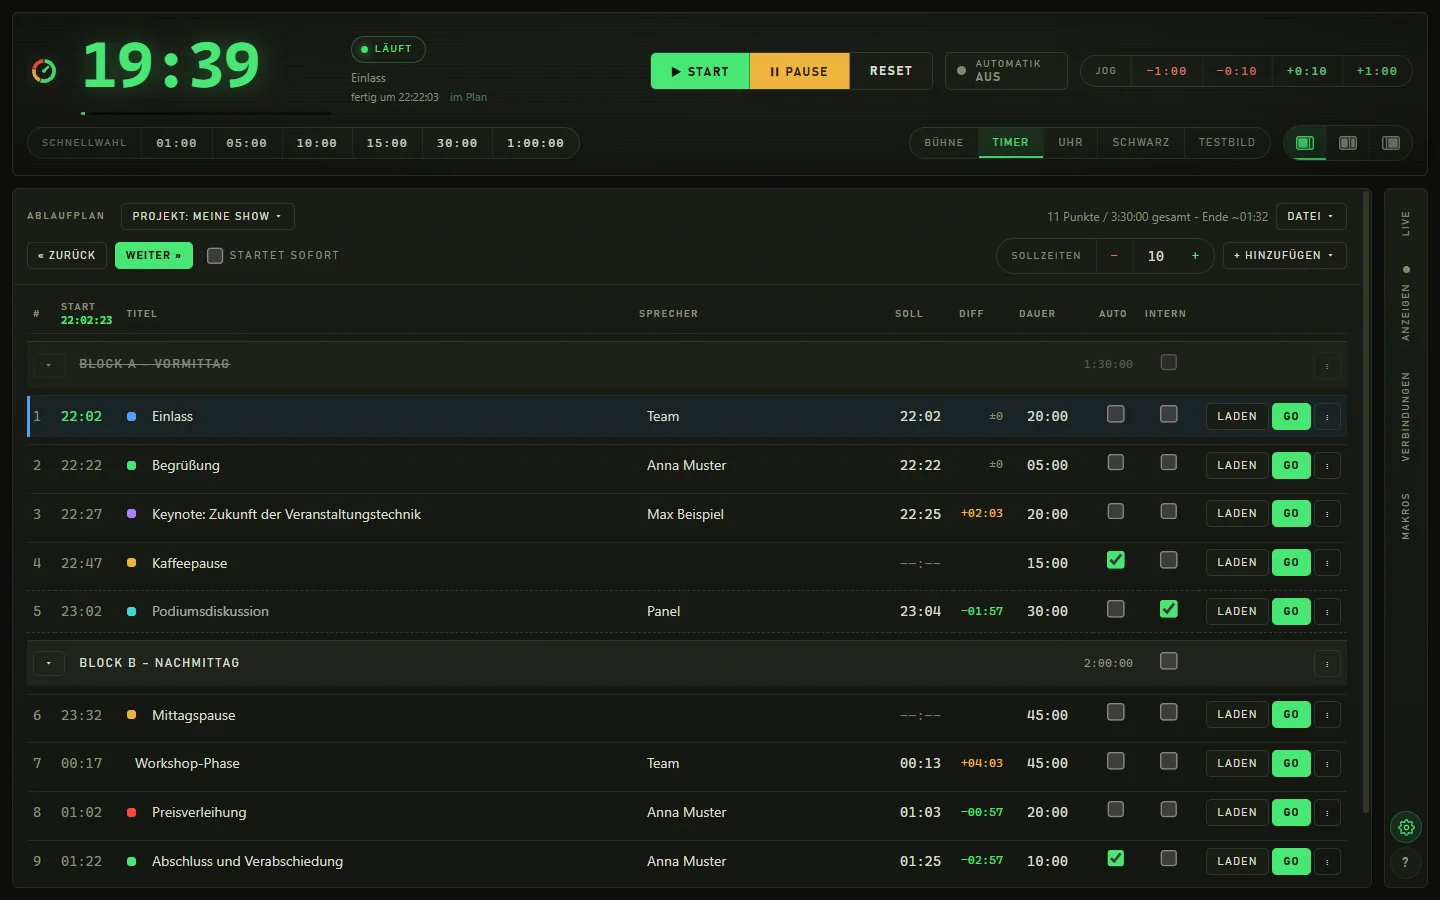
The rundown is your show as a list. Each row is an item, a note, an external time source or a block heading. The table works from what is actually happening and shows you at any time when the next item really starts.
The rundown in the “Rundown only” view: blocks, color markers, forecast start times and Diff.
Four row types
“+ Add” appends one of these to the end of the rundown: an item (an item with a duration that runs in the timer), a text (a note row without a time, such as changeover – it is skipped), an external item (the time comes from QLab, HyperDeck, PowerPoint or your own system) or a group (a heading that divides the rundown into blocks). Each entry in the menu has a line of explanation.
Click “+ Add” and choose the type.
The dashed row “+ Item” below the list quickly appends an item.
Edit items right in the table
Title, speaker, planned time and duration are input fields in the row. The duration accepts mm, mm:ss or hh:mm:ss, the planned time a clock time as HH:MM. Changes are saved immediately and also appear on all displays.
Click into the field, type, then press Tab or Enter.
The “Auto” checkbox automatically advances to the next item at zero and starts it.
Tip: The “Speaker” column only appears if the rundown has speakers and there is enough space; otherwise you enter the speaker in the detail row (⋮). In the “Rundown only” view it grows with the window so long names stay readable.
Load, GO and double-click
“load” puts the item on the timer without starting (with an ATEM, the source moves to Preview). “GO” loads and starts immediately. A double-click on the row also loads – deliberately not a single click, so nothing gets loaded by accident while editing.
“load” and “GO” buttons on the right of the row, or double-click the row (outside of input fields).
Tip: GO also starts external items; the time itself then keeps coming from the external source.
Next and back – with or without auto-start
“« back” and “next »” step through the rundown; text rows and groups are skipped. By default, “next” only loads the next item (the ATEM Preview is ready), and GO starts it. With the “auto-start” checkbox, one click on “next” loads and starts in one go – including ATEM source, macros and Automation. This also applies to Companion, HTTP and OSC.
Keys: N = next item, P = previous item.
Check or clear the “auto-start” checkbox to the right of “next »”.
Tip: For the Stream Deck there is also the “NEXT + START” button, which always loads and starts regardless of the checkbox.
Advance automatically (Auto)
An item with the “Auto” checkbox loads and starts the next item by itself at zero. An end action (message, clock, black) fires before that, if set.
Check the row’s “Auto” column.
Text rows as notes
Plain notes without a time, for example “Changeover” or “Lights out”. Next, back and Auto skip them; they appear in the rundown and in the crew views, and can be marked as “internal”.
“+ Add” → Text.
External items
An external item gets its remaining time from outside – for example from the running QLab cue, the HyperDeck clip, the video on a PowerPoint slide or your own script. At zero, the show moves on as usual. If the source drops out, the display freezes and the header warns in red. A dot after the title shows the state of the source.
“+ Add” → External, then ⋮ → choose “Source (slot)”, for example qlab, hyperdeck or powerpoint.
The list of reported sources is in the Connections tab, in the “External sources” card.
Groups and blocks
A group divides the rundown into sections such as “Block A – Morning”. The total duration of the block is on the right, and the triangle collapses it – when collapsed, the sum stays visible, as does the item that is currently running. Groups have their own color and are skipped when advancing; the item numbering does not change as a result.
“+ Add” → Group, type the name, ▾ to collapse.
Insert items in the middle of the rundown
When you hover between two rows, the buttons “+ Item”, “+ Text”, “+ External” and “+ Group” appear. The new entry lands exactly there, not at the end.
Hover between two rows and click the button you need.
Start column with forecast
The “Start” column works from actual progress instead of the plan: the column header shows the current time of day, and below it, each item shows when it will begin as things stand now. If an item overruns, all following times shift immediately, as does the expected end in the rundown header. Items that have already run show their actual start time, dimmed.
Nothing to set up; the column updates continuously.
Difference from the planned time (“Diff” column)
The column shows how far each item deviates from its planned time: plus means later than planned, red from 5 minutes, green when ahead; up to 30 seconds of deviation counts as on schedule. A delay carries through all following items; if you shorten a break, the Diff of the items after it drops again immediately. If the time is more than three hours off the planned time (for example on the morning of day 2), the field stays empty instead of claiming a delay.
Enter planned times (HH:MM) in the “Plan” column – without a planned time there is no Diff.
Tip: The same column is in the rundown board for the crew in the browser.
Shift planned times together
If admission runs late, one click shifts everything from the running item onward by the minutes you set. Whatever has already run keeps its planned time. The same button in the other direction undoes it.
In the rundown header next to “Plan”, enter the minutes (default 10) and click − (earlier) or + (later).
Internal: visible only to you
An item with the “internal” checkbox stays visible to you but does not appear in any crew view – not in the rundown board, not in the dashboard and not on stage. This is meant for director’s notes and playback cues when a client is looking at the rundown.
Check the row’s “internal” column (applies to items, text rows and groups).
Summary and highlighting
The rundown header shows the number of items, the total duration and the expected end. The running item is highlighted, and finished ones carry a checkmark. The header of the rundown scrolls along with you so that “next” and “+ Item” stay visible in long rundowns.
Nothing to set up.
Help right in the rundown
Below the list, a collapsible help block explains duration, Auto, end action, text rows, next/start, ATEM source, macros on the item, Plan and Diff, AI import and the CSV format.
Expand “Help on duration, Auto, end, text cues and CSV”.
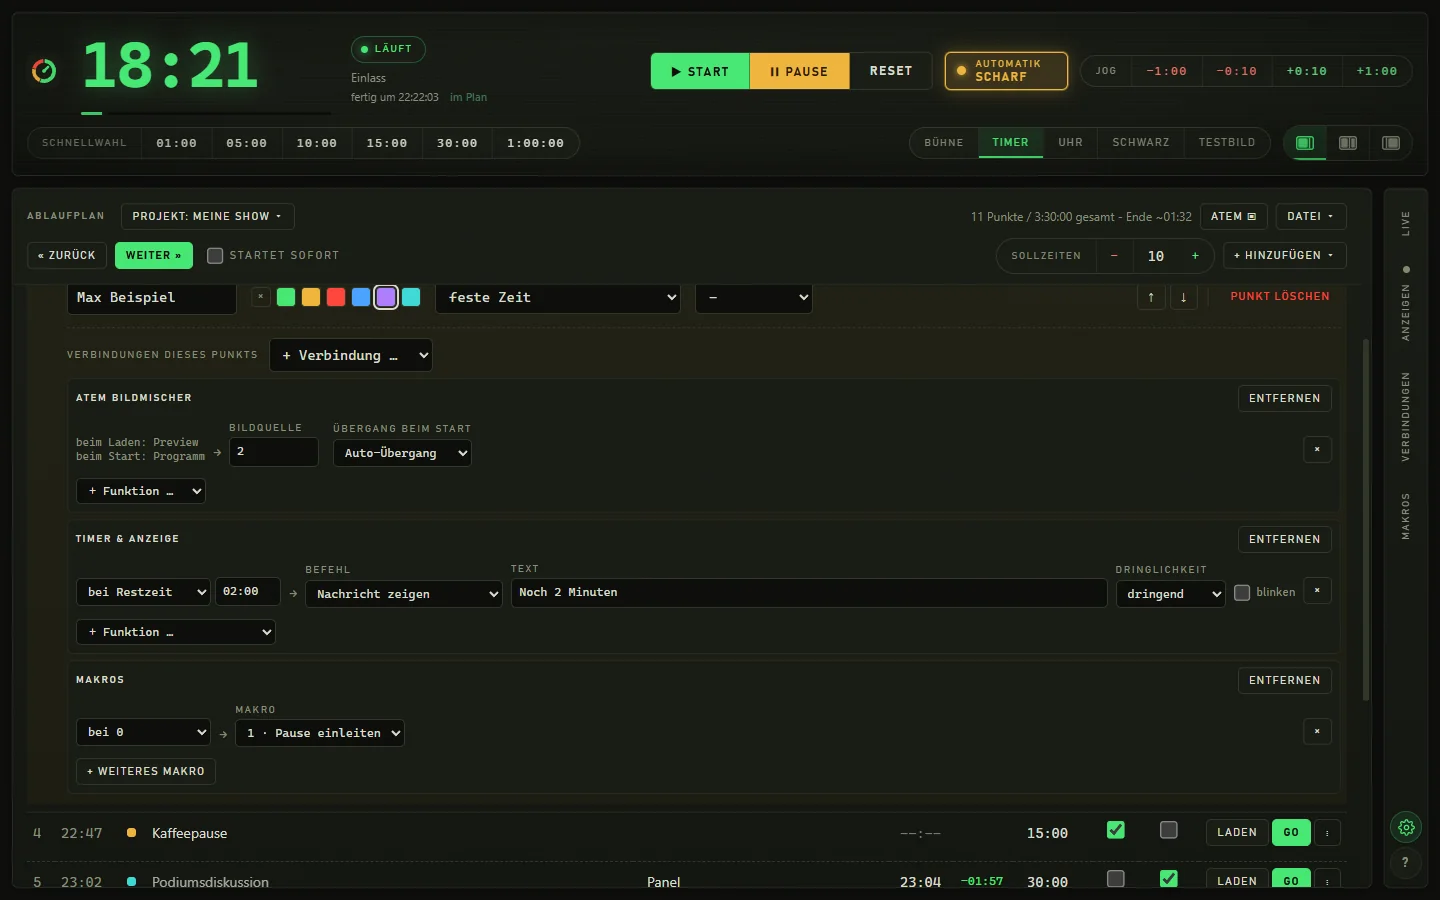
Item details (⋮)
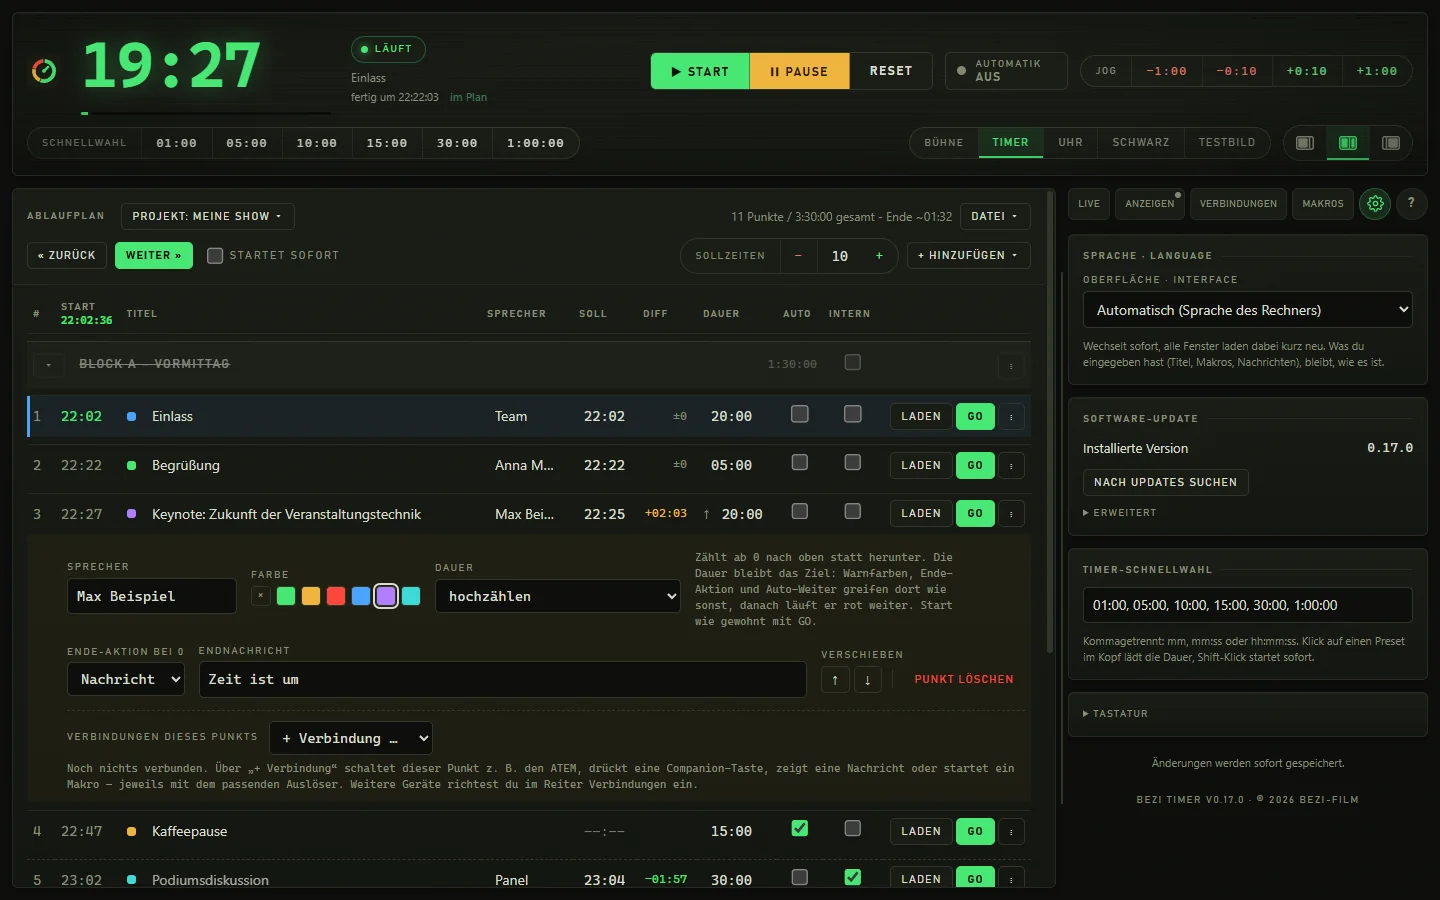
The ⋮ button at the end of the row expands the item’s detail row. Everything that doesn’t belong in every row is here: duration type, end action, color, source, order and delete.
The detail row: color, duration type, end action, move and delete.
Duration type: fixed, until the next planned time, or count up
“fixed time” is the normal case. “until the next planned time” is a show countdown: the item counts down to the next planned time in the rundown, runs immediately when loaded and starts in overtime if that time has already passed – ideal for the lead-up before the show starts. “count up” counts up from 0, for discussions and changeovers where you care how long it has already taken. The duration you enter remains the target: warning colors, end action and auto-advance take effect there as usual, after which it keeps running in red.
Expand ⋮ → “Duration” field → fixed time, until the next planned time or count up.
Count-ups show an upward arrow in the Duration column; show countdowns display the target (“→ 19:00”).
Tip: Stage display, crew views, Stream Deck and Interspace displays all show the same number for a count-up.
End action at zero
Triggers an additional action at zero: a message (default “Time is up”), the clock display or black. It fires before any auto-advance.
Expand ⋮ → “End action at 0” → Message, CLOCK or BLACK.
The “End message” field only appears when “Message” is selected.
Color marker
A small fixed palette (green, amber, red, blue, violet, turquoise) for categories such as tech, break or hosting. The color appears as a dot before the title; when the item runs, its row takes on that color instead of the usual green.
Expand ⋮ → “Color” → click a color, the × removes it.
Speaker and source
The speaker field is always in the detail row too, even if the table column is hidden. For external items, you choose the source (slot) here from a list of known sources or type in a custom name.
Expand ⋮ → “Speaker” or “Source (slot)”.
Move and delete
With ↑ and ↓ you move an entry up or down in the order. “Delete item” sits next to it, small and red, and needs two clicks: first the button asks, then it deletes.
Expand ⋮ → “Shift” ↑ or ↓.
Click “Delete item” twice.
Automation on the item
In the “Connections of this item” area (⋮ → “+ Connection”) you first choose the connection, then function and trigger. The expanded item only shows what it actually uses – simple things don’t need a macro of their own.
“Connections of this item”: function and trigger per connection.
First connection, then function and trigger
“+ Connection” adds whatever is set up: ATEM video switcher, Companion button, QLab, HyperDeck, PowerPoint, OSC command, Timer & display, Macros and HTTP request. Each connection has matching functions, each with its own trigger. Example: “at remaining 2:00 → message ‘2 minutes left’” or “at 0 → Companion button 1/0/3”.
Expand the item (⋮) → “+ Connection …” → choose a connection.
Use “+ Function …” or “+ Command …” to add more rows, an × removes a row, “remove” the whole block.
Tip: Incomplete rows are marked (“Select source”) and are never executed.
Six triggers
Each function is tied to a trigger: on load, on start, on pause, at a specific remaining time, at 0 or when leaving the item. For “at remaining” you enter the time (for example 2:00).
In the row, change the “Trigger” selection field; for “at remaining”, enter the time next to it.
ATEM source on the item
With an ATEM connection set up, you enter a source for each item (for example “Camera 2”): on load it goes to Preview, on start to Program – as a Cut or Auto transition, by default or selectable per item. Inputs come with their names from the switcher. The ▣ symbol before the title changes color according to the real state: red when the source is on Program, green on Preview.
⋮ → “+ Connection” → ATEM video switcher → “+ Function …” → “Source”.
Choose the source and optionally “Transition on start” (Default, Cut, Auto transition).
Tip: If, three seconds into a running item, the switcher sends something different (someone switched by hand) or can’t be reached, a warning appears at the top – but only when Automation is armed.
More ATEM functions on the item
Besides the source, the item offers the ATEM functions Program, Preview, Cut, Auto transition, Start macro, Fade to Black and Downstream and Upstream keyer on/off – each with a trigger. The names of the ATEM macros come from the switcher; an empty macro slot is reported as an error in the log instead of silently doing nothing.
⋮ → “+ Connection” → ATEM video switcher → “+ Function …” → the function you want.
Companion, QLab, HyperDeck, PowerPoint, OSC, HTTP on the item
The same steps as in the macro editor can be set up directly on the item: press a Companion button, QLab and HyperDeck commands, PowerPoint functions (for example “Open presentation” on load), send an OSC command or fire an HTTP request. “Open presentation” gets the trigger “on load” by default and gets the file ready as a show right away.
⋮ → “+ Connection” → choose a connection → set function and trigger.
Timer & display on the item
The “Timer & display” block offers Start, Pause, Toggle Start/Pause, Set time, Extend/shorten time, Next, Next & Start, Back, Show message, Hide message and Toggle display. The default is “at remaining 2:00 → message ‘2 minutes left’ (urgent)”.
⋮ → “+ Connection” → Timer & display → choose a function and enter text, time or mode.
Macros on the item
You attach ready-made macros from the “Macros” tab to a trigger via the “Macros” block. A symbol (↯) before the title shows that automation is attached to the item; its tooltip lists the triggers without you having to expand it.
⋮ → “+ Connection” → Macros → choose a macro and trigger.
Tip: If a macro is deleted later, the row is marked “(macro deleted)”.
“Not armed” is always visible
When Automation is off, every item with connections shows a yellow note with the “Arm” button, and the log reports what was skipped on load or start, for example “Input 1 to Program: not executed”.
Click “Arm” (a second click confirms).
Importing rundowns: AI and CSV
You don’t have to type in your rundown. A local AI reads Word, Excel, PDF and text files, and clean spreadsheets even work without AI. Everything stays on your computer, and nothing is appended until you confirm.
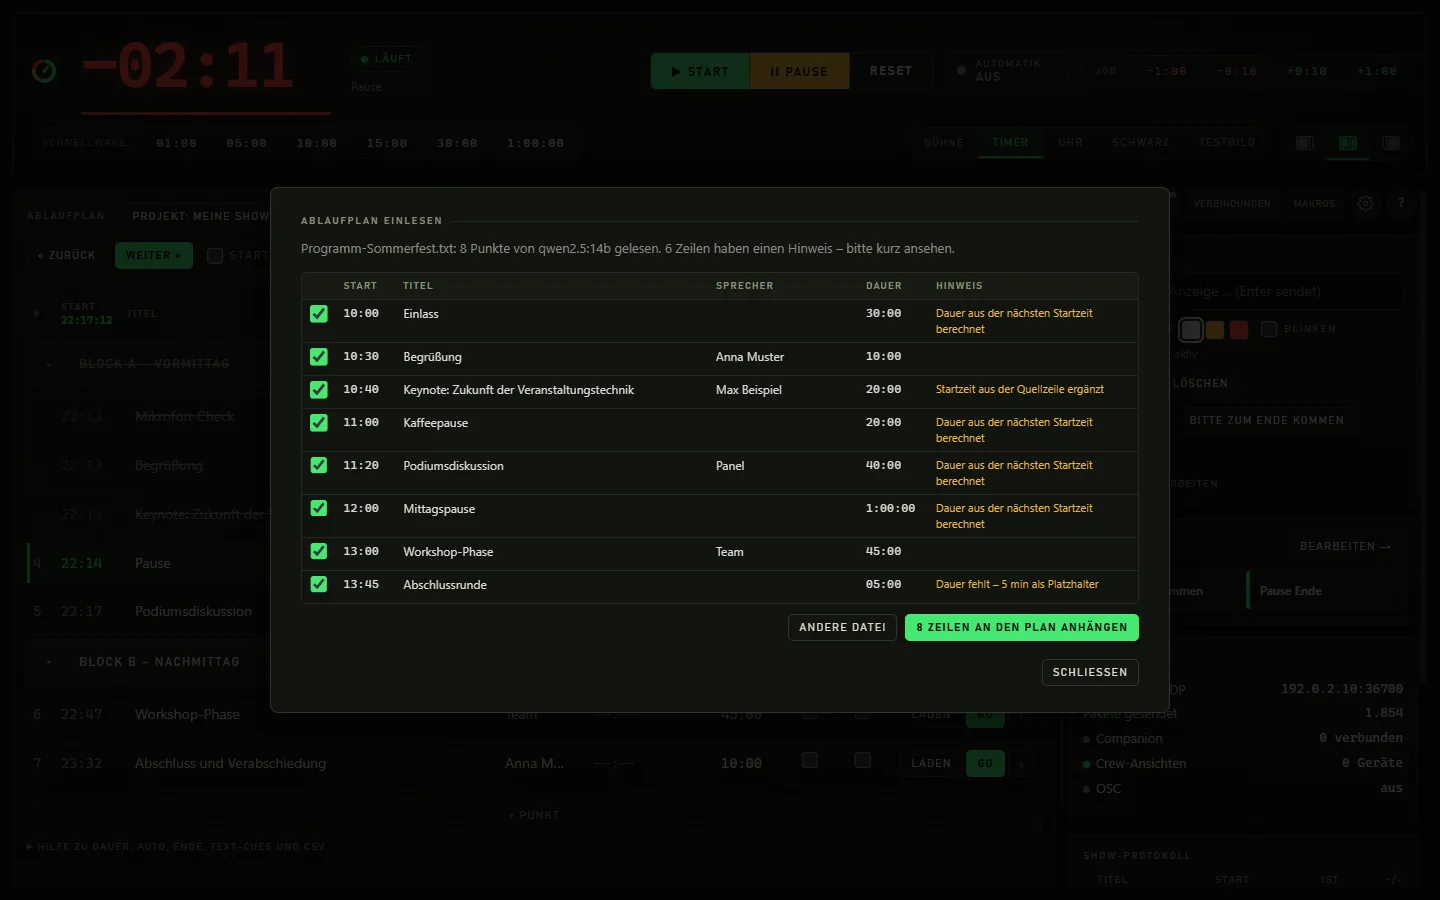
The AI import preview: review first, then append to the rundown.
Import a rundown (AI)
Drag a file into the window or choose File → “Import rundown (AI) …”. A local AI (via Ollama) detects items, speakers, start times, durations, headings and notes and shows them as a list first. One click and everything lands in the rundown. The AI only reads; the code does the math itself.
Drag the file onto the window (“Drop rundown here”) or click “Drop file here” in the dialog.
Alternatively: expand “Or paste text”, paste text (for example from an email), then click “Analyze text”.
Check the preview and click “Append to rundown”.
Tip: Supported formats are .docx, .xlsx, .pdf, .csv and .txt. The app doesn’t read old formats (.doc, .xls, .pages, .numbers, .rtf) – the dialog tells you how to get there (save as .docx, .xlsx or PDF). PDFs must contain real text; pure scans don’t work.
Missing durations are calculated
If the source has no duration, the app works it out from the start and end time or from the next start time. Anything that was estimated and anything that looks unusual (for example a very long duration) is flagged in the “Note” column of the preview.
Clean Excel and CSV spreadsheets with the usual column headers don’t go to the AI at all: faster and deterministic. Optionally, the app accepts error-free results right away.
Check “Accept immediately when there is nothing to review” in the import dialog.
Set up the local AI with one click
If Ollama is missing, the dialog shows step-by-step help with a download link. If Ollama is running without a language model, the timer downloads a suitable model itself – chosen by available memory, with a progress bar – so you don’t need a command prompt. You can change the model choice, and the AI server can also be another computer on your own network.
In the import dialog: install Ollama, “Load model”, “Check again”.
Expand “Change AI server”, enter the address, “Check”.
Tip: With Ollama and a language model, the import runs completely offline; no rundown goes to the internet.
Import CSV
Reads a CSV file exported from Excel and appends the items to the existing rundown. The expected columns are Title;Speaker;Duration;Start;Auto; a header row is optional and is recognized by common column names (for example Title, Speaker, Duration, Start, Auto). The delimiter (semicolon or comma) is detected automatically, and Excel times such as 18:00:00 become 18:00. Rows without a duration become text notes; “Auto” recognizes 1, x, ja, yes, true and wahr.
File → “Import CSV …” → choose a file.
Projects and files
Every event is a project. Use projects to switch between shows, duplicate a rundown as a template and take a show to another computer. Everything saves automatically.
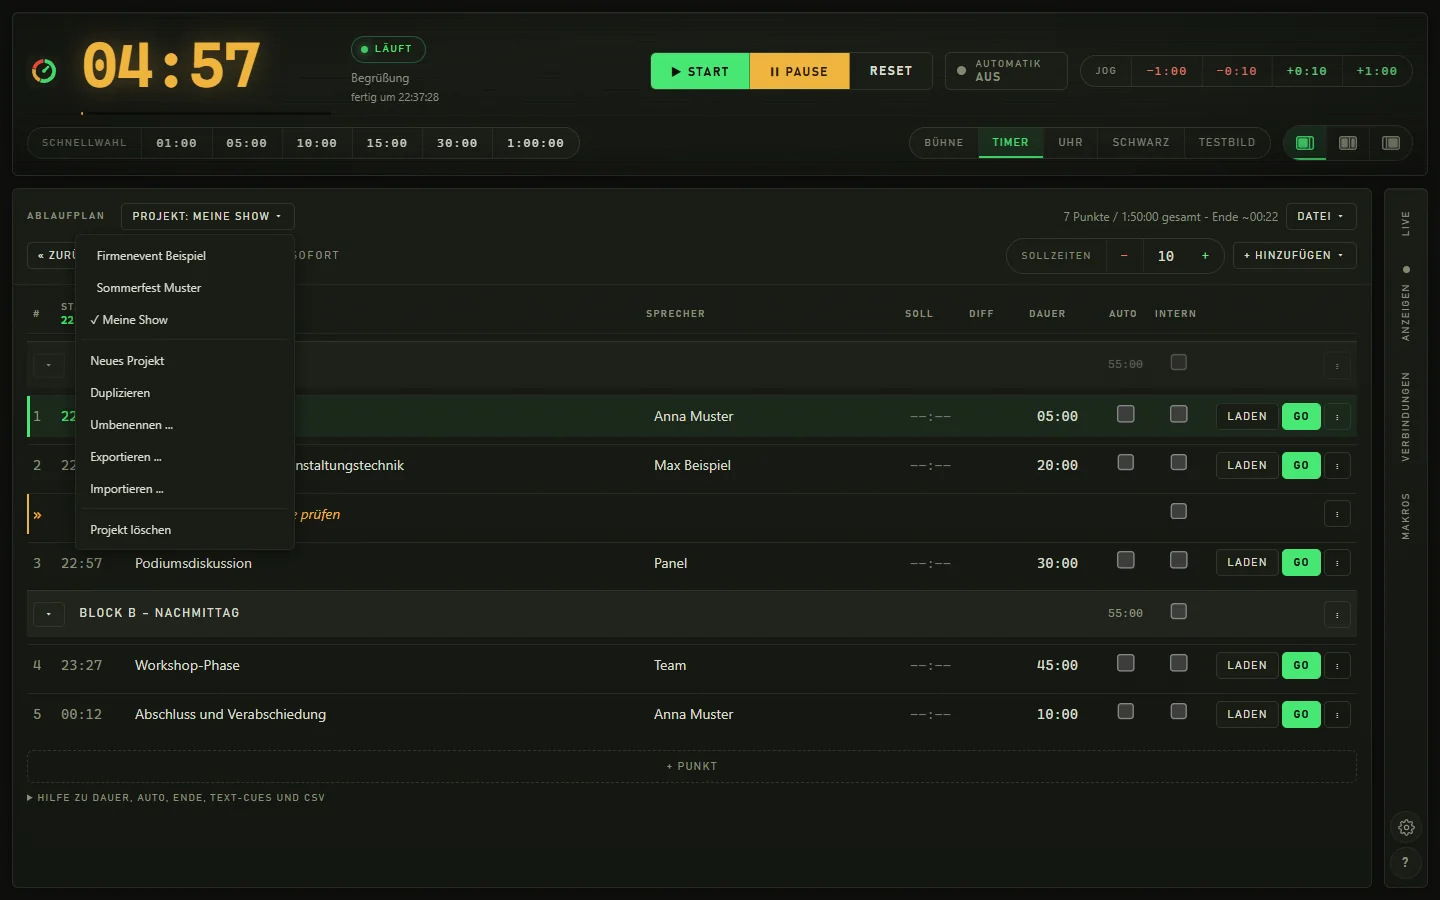
The project menu: switch between shows, duplicate, export and import.
Project menu
At the top left of the rundown you switch between projects: New project, Duplicate, Rename, Export, Import, Delete project. A project bundles the rundown, dashboard layout, message presets, timer quick select and show log. The technical setup (Interspace, Companion, network, display, macros) stays unchanged when you switch, because it belongs to the computer and the venue, not to the event.
Click the “Project: …” button in the rundown header and choose from the menu.
Delete projects via “Delete project”.
Take a project along as a .bezishow file
“Export …” writes the project to a .bezishow file that you can open again on another computer with “Import …” – handy for moving between your office computer and the control-room computer.
Project menu → “Export …” or “Import …”.
File menu: open, import, save
The File menu bundles “Open rundown …” (JSON), “Import rundown (AI) …”, “Import CSV …”, “Save as …” (JSON) and “Getting started & FAQ …”. The rundown saves itself on every change anyway and survives every restart; “Save as” additionally creates a file of your choice.
“File ▾” button in the rundown header.
Getting started and FAQ in the app
A dialog walks you through four steps – filling the rundown, setting up the display, running the show and bringing the crew along – and answers common questions.
File → “Getting started & FAQ …” or in help mode at the bottom right.
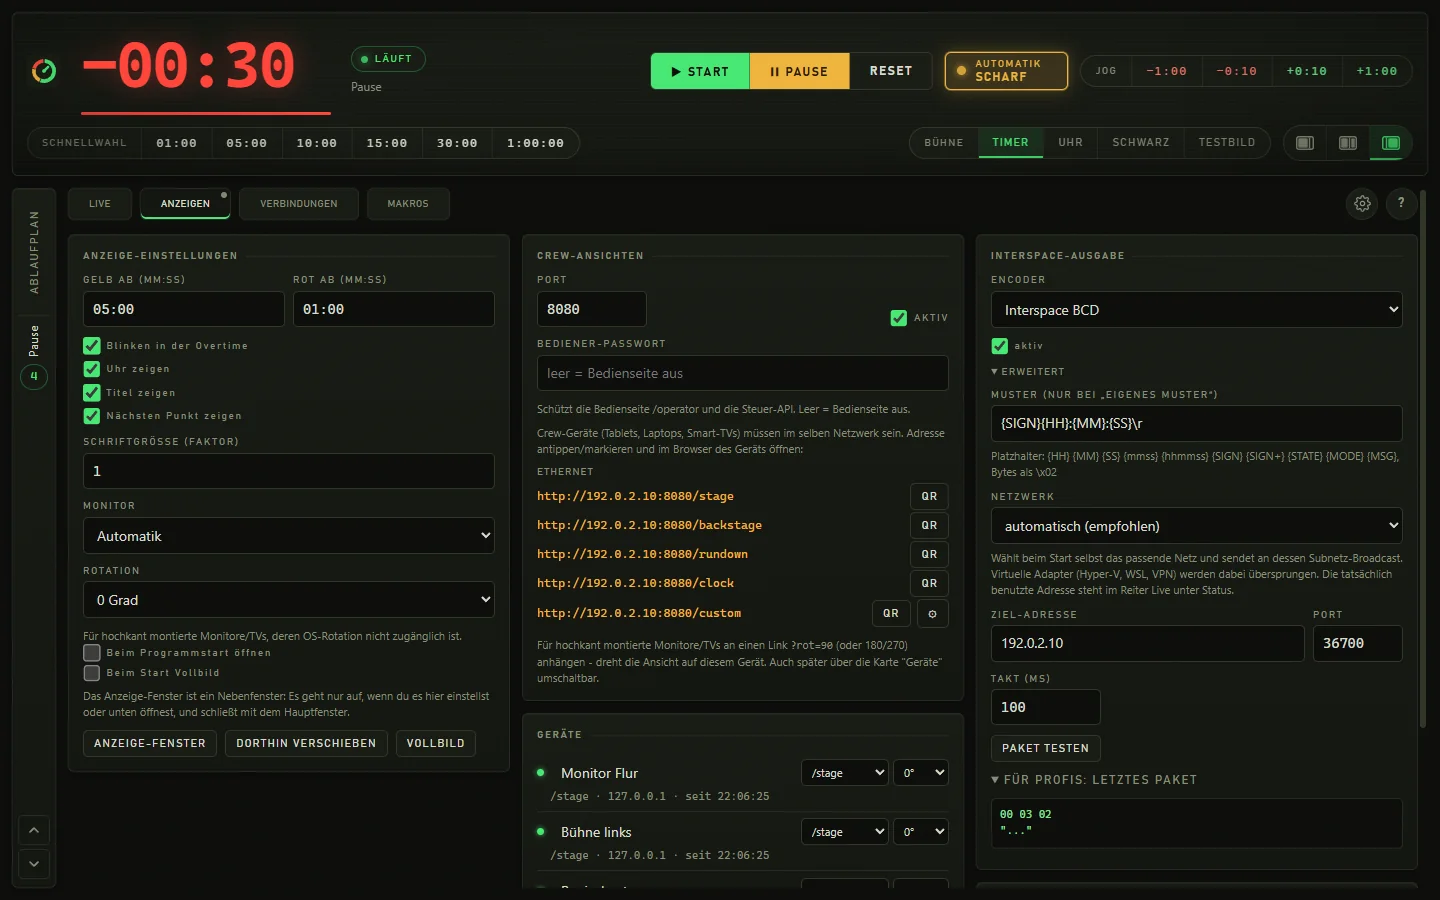
The “Displays” tab
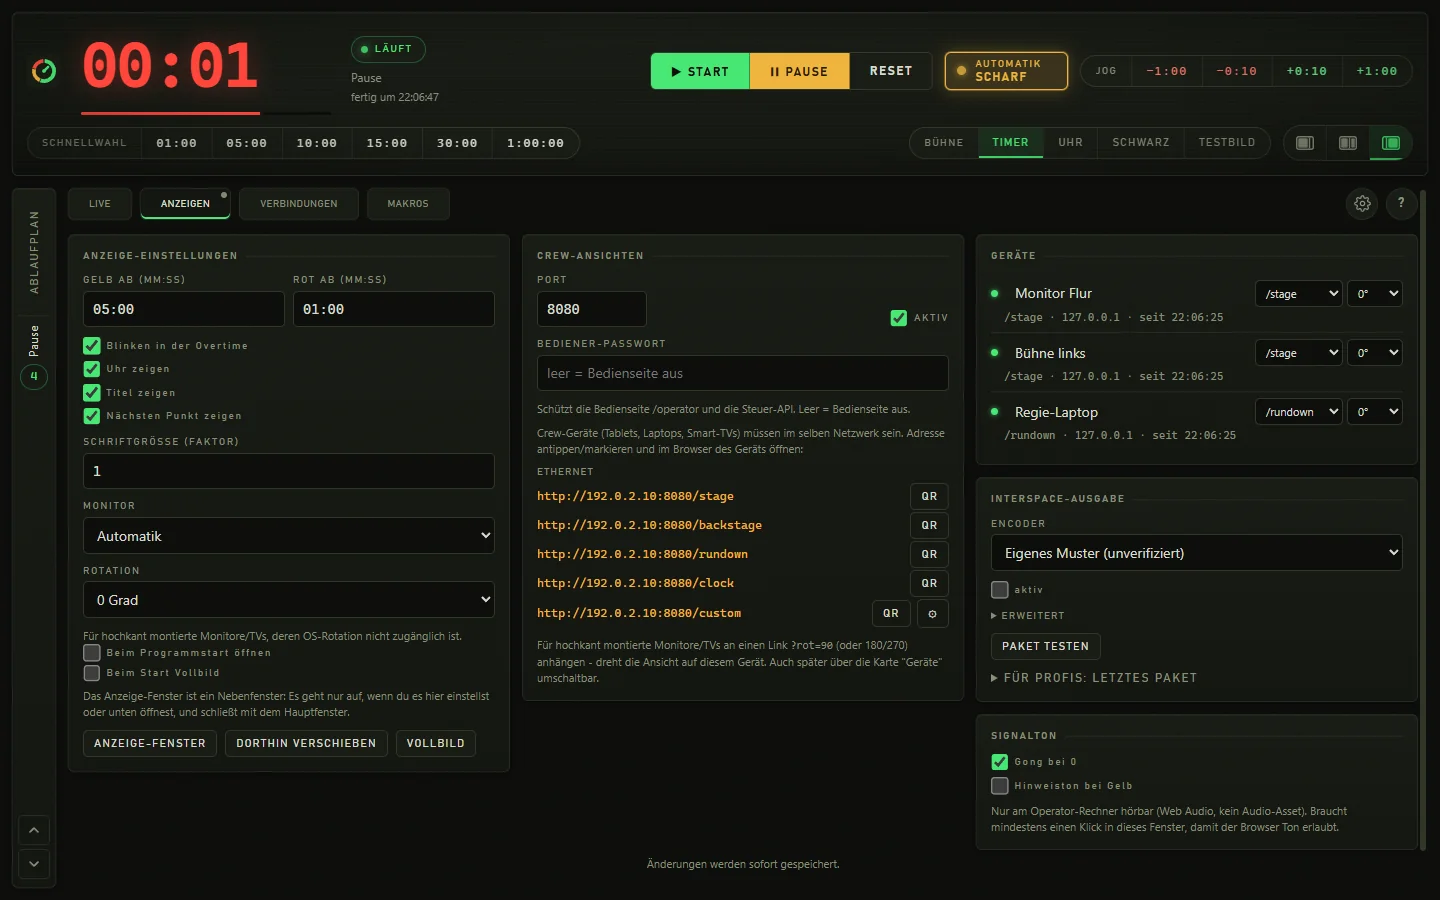
Everything the audience and crew get to see: warning thresholds, stage window, crew links, device list, Interspace output and alert tone. Changes are saved immediately.
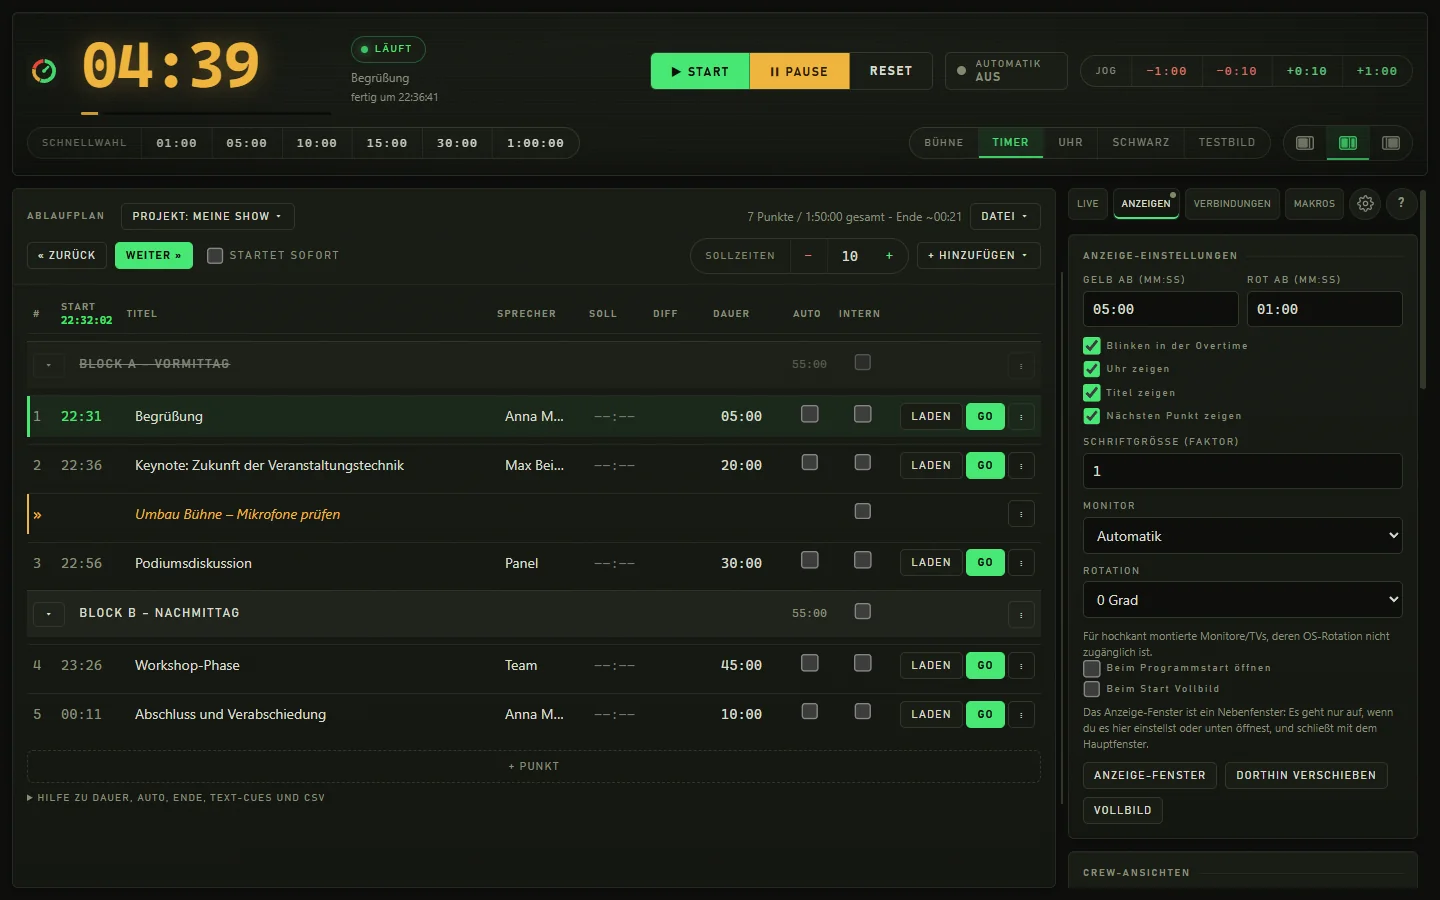
The “Displays” tab.
Display settings
Sets when the time turns yellow and red, and what appears in the stage window: blinking in overtime, clock, title, next item, font size (factor 0.5 to 2) and the destination (monitor, rotation 0/90/180/270 degrees).
“Displays” tab → “Display settings” card.
Rotation is meant for monitors and TVs mounted in portrait whose operating system doesn’t offer rotation.
Display window as a secondary window
The display window doesn’t open on its own, only when you open it or check “Open at app launch”. It closes with the main window. With “Fullscreen on start”, it sets itself up on the chosen monitor from now on.
“Display window” opens it, “move there” moves it to the chosen monitor, “Fullscreen” toggles fullscreen (also with the F key, or F11 in the Window menu).
The monitor choice “Automation” picks the second monitor, if there is one.
Alert tone on the operator computer
A gong at zero and, optionally, a notification tone when the yellow phase is reached – audible only on the operator computer, no audio file needed.
“Alert tone” card: “Gong at 0” (on by default) and “Notification tone at yellow”.
The browser requires at least one click into the window before it plays sound.
The display window (stage monitor)
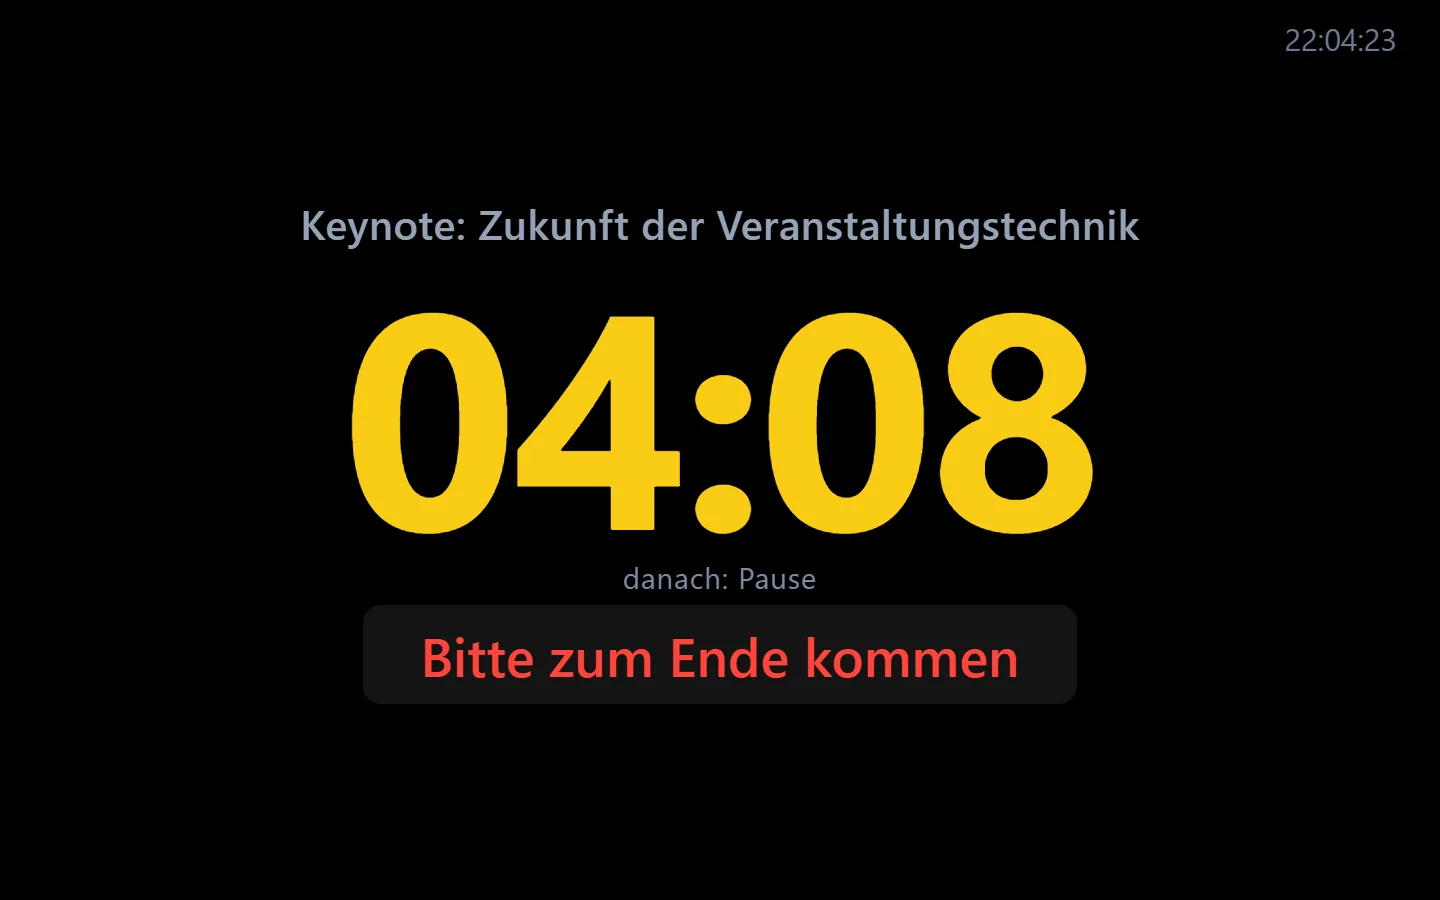
The display window is meant for projectors and stage monitors: a big number, easy to read from a distance, with no controls. It opens on the second monitor, a double-click toggles fullscreen, and the mouse pointer hides after a moment of inactivity.
The stage monitor: remaining time, title, “next:” and time of day.
Countdown in traffic-light colors
Green, yellow from the warning threshold (default 5 minutes), red shortly before zero (default 1 minute), and blinking red with a minus sign in overtime. Long times (one hour or more) are scaled down so nothing runs off the edge.
Thresholds and blinking: “Displays” tab → “Display settings”.
Title, “next:” and clock
The window shows the title of the running item, below it “next: …” with the next item, and the time of day at the top. Each of these elements can be turned off individually.
Checkboxes “Show clock”, “Show title” and “Show next item” under “Display settings”.
Pause and Ready clearly readable
When the timer is paused, a clear PAUSE notice appears; when the timer is stopped, it shows “Ready”. That way a speaker can tell at a glance whether the time is running.
Nothing to set up.
Messages in color
Messages from the Live tab appear large in the window – normal, in amber (urgent) or in red (immediate), blinking if you like.
Send a message in the “Live” tab (see there).
Modes: Clock, Black, Test pattern
Depending on the switch in the header, the window shows the time of day, a black screen or a test pattern for calibrating the display instead of the timer. The slide number (“Slide 7 / 32”) can be shown as well.
“Stage” switch in the header, or keys C (clock) and B (black).
Slide number: in the PowerPoint connection, check “Also show the slide number on the stage display”.
Crew views and devices
The built-in web server turns any browser on the same network into a display. Tablets, laptops, phones and smart TVs open a link or scan a QR code – no installation. The “Crew views” card in the “Displays” tab manages this.
Links, QR code and device list for the crew in the browser.
Links and QR codes for every network
For every network card in the computer, the app lists the links to Stage, Backstage, Rundown, Clock and your custom dashboard. The links can be selected and copied, and a QR button shows the code large.
“Displays” tab → “Crew views” → copy a link or click “QR” (clicking the background or Esc closes it).
Change the port and turn the crew views on and off via “active”.
Tip: The devices must be on the same network, and the web server must be active. On first launch, the operating system may ask for firewall permission.
Displays mounted in portrait
If you append ?rot=90 (or 180 or 270) to a link, the view rotates on that device – for monitors whose operating system doesn’t offer rotation.
Add ?rot=90 to the link, or switch it later in the Devices card.
Devices card: label and switch remotely
The “Devices” card lists every device that currently has a crew page open, with its view, address and connection time. You can switch it to a different view and rotation remotely – handy when the stage monitor is out of reach without a ladder. You can label a device (“Hallway monitor”, “Colleague’s phone”); the name stays with the device, even after a restart, a view change or a new IP address. If the page briefly disconnects, the row stays on screen, grayed out.
Type a name into the field (Enter or leaving the field saves it).
Dropdown next to it: choose the view (/stage, /backstage, /rundown, /clock, /custom, /operator) and rotation.
Tip: With an old bookmark, reload the page once so the device reports its ID.
Operator password and control page
Once a password is set, the /operator page is added: a protected control page that lets even external staff control the timer from a phone or tablet. The password also protects the control API. Without a password, the control page is off and the control API stays open as before, so existing HTTP triggers keep working.
Fill in the “Operator password” field; empty = control page off.
The browser views at a glance
All views run in the browser, reconnect on their own (a banner reports “Connection lost - trying to reconnect …”) and show the same time as the control window. Items marked “internal” appear in none of them.
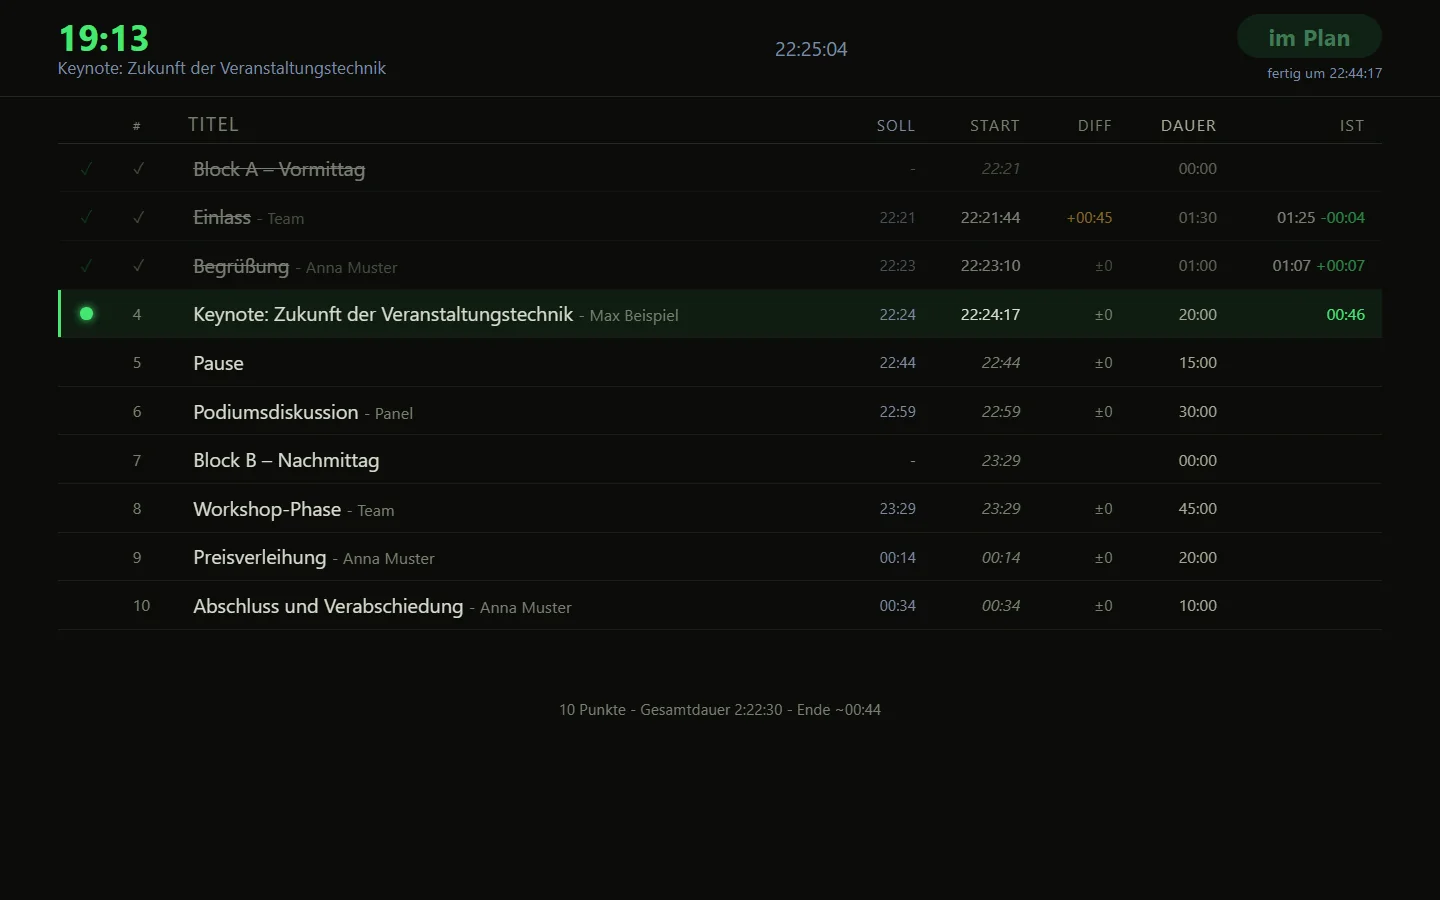
The rundown board in the browser: the same times as in the control window.
/stage – Stage
The big countdown with the item title, message in color and slide number – for stage monitors and speakers.
Open the link from the “Crew views” card in the browser.
/backstage – Backstage
Time of day, title, countdown, the “finishes at …” line with the deviation from the rundown (“on schedule”, “+3 min over plan”, “2 min ahead of plan”), the next item and the message – for stage managers and tech.
Open the link in the browser.
/rundown – Rundown board
At the top, the board shows time, title, clock, deviation and “finishes at”; below that, the rundown with the columns Status, Number, Title (with speaker), Plan, Start, Diff, Duration and Actual. For items that have run, the Actual column shows the real duration along with the deviation. The running item pulses, completed ones carry a checkmark; the footer lists the number of items, total duration and end. Control room and crew look at the same times you do.
Open the link in the browser.
/clock – Clock
Just the time of day, large. If the connection drops, it keeps running on the device clock.
Open the link in the browser.
/custom – custom dashboard
The freely composed view from the dashboard editor, for example for a client (see the next section).
Open the link in the browser; changes in the editor appear immediately.
/operator – control page for your phone
After signing in with the operator password, you control start, pause, reset (with a second click), jog, back and next, load items from the list and send messages. The session runs on a token; when it expires, you return to the sign-in.
Set the password in the “Displays” tab, open the /operator link and sign in.
Rotation and device name via link
All views understand ?rot=0/90/180/270 and ?name=…, which a device uses to introduce itself in the Devices card.
Append the parameter to the link.
Custom dashboard (editor)
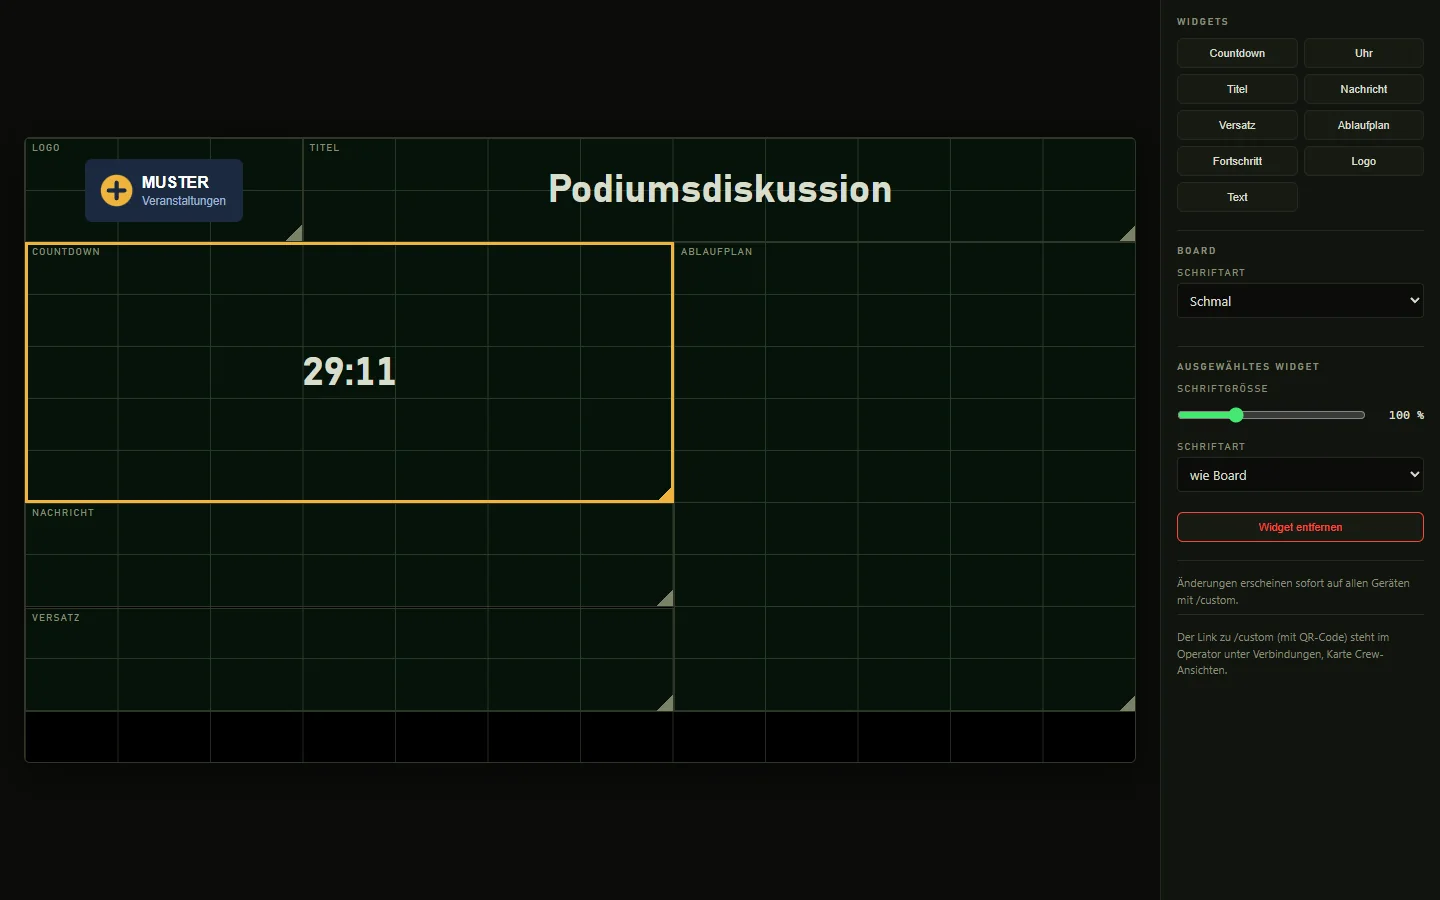
With the dashboard editor you build a tailor-made view from building blocks – for example for a client or a monitor for the next speaker. The result is live at /custom on any device.
The dashboard editor: drag, scale and style blocks.
Nine building blocks
Countdown, clock, title (optionally with the next item), message, offset (deviation from the rundown), rundown, progress bar, logo (your own image) and free text in three base sizes.
“Displays” tab → “Crew views” card → gear next to /custom.
In the editor, click the block you want under “Widgets” in the right sidebar.
Arrange and scale
The blocks sit on a grid; you drag them where you want them and scale them with the handle at the bottom right. Changes appear immediately on all devices showing /custom.
Drag a block to move it, drag the handle at the bottom right to scale it, “Remove widget” deletes it.
Font per block and for the whole board
Every block with text gets a font size (25 to 300 percent) and a typeface; there is also a typeface for the whole board. The options are Default, Narrow, Wide, Serif and Monospace – system fonts only, so other devices don’t have to download anything.
Click a block, then set “Font size” and “Typeface” on the right; “Board” → “Typeface” for all.
Logo and free text
For the logo you choose an image file (PNG, JPG, SVG); for the free text you type the text and the base size. The layout belongs to the project and travels with the .bezishow file.
Choose the “Logo” block → “Choose image …”; choose the “Text” block → enter text and size.
Interspace displays (UDP)
The Interspace output sends the time via UDP to network displays (CDEther receivers with an Interspace display), so that hardware in the room shows the same number as the screen.
The Interspace output: encoder, network and test packet.
“Interspace BCD” encoder
The built-in 3-byte format for Interspace numeric displays: minutes and seconds as BCD and a color zone (green, yellow, red). The thresholds come from the display settings. In overtime, the display counts up the overrun time and blinks red; in clock mode it shows hours and minutes. In Black and Test pattern modes, nothing is sent and the display holds its last value. The format has been verified on a real display.
By default, the app picks the most plausible network and sends to its subnet broadcast. Virtual adapters (Hyper-V, WSL, Docker, VMware, VPN) and cards without a connection are skipped. If you have already chosen a network card or entered an address, your setting stays.
Expand “Advanced” → “Network” (automatic, manual or a network card) and, if needed, set the destination address, port and interval (ms).
Tip: If the computer is on several networks, choosing the network card or the subnet broadcast address of the display network helps.
Custom pattern for other displays
For displays with a different format, choose the “Custom pattern” encoder and enter the packet format. Placeholders are {HH} {MM} {SS} (two digits), {H} {M} {S} (no leading zero), {MMM} (minutes, three digits), {mmss} {hhmmss}, {SIGN} and {SIGN+} (sign), {STATE}, {MODE}, {MSG}, as well as any bytes in hex such as \x02. Examples: \x02{mmss}\x03 or T{SIGN}{HH}:{MM}:{SS}\r\n.
“Advanced” → fill in the “Pattern” field, then “Test packet”.
Test packet and capture
“Test packet” sends a sample, and under “For pros: last packet” the generated bytes appear as hex and ASCII. That lets you check a pattern for an unknown display byte by byte before anything is sent.
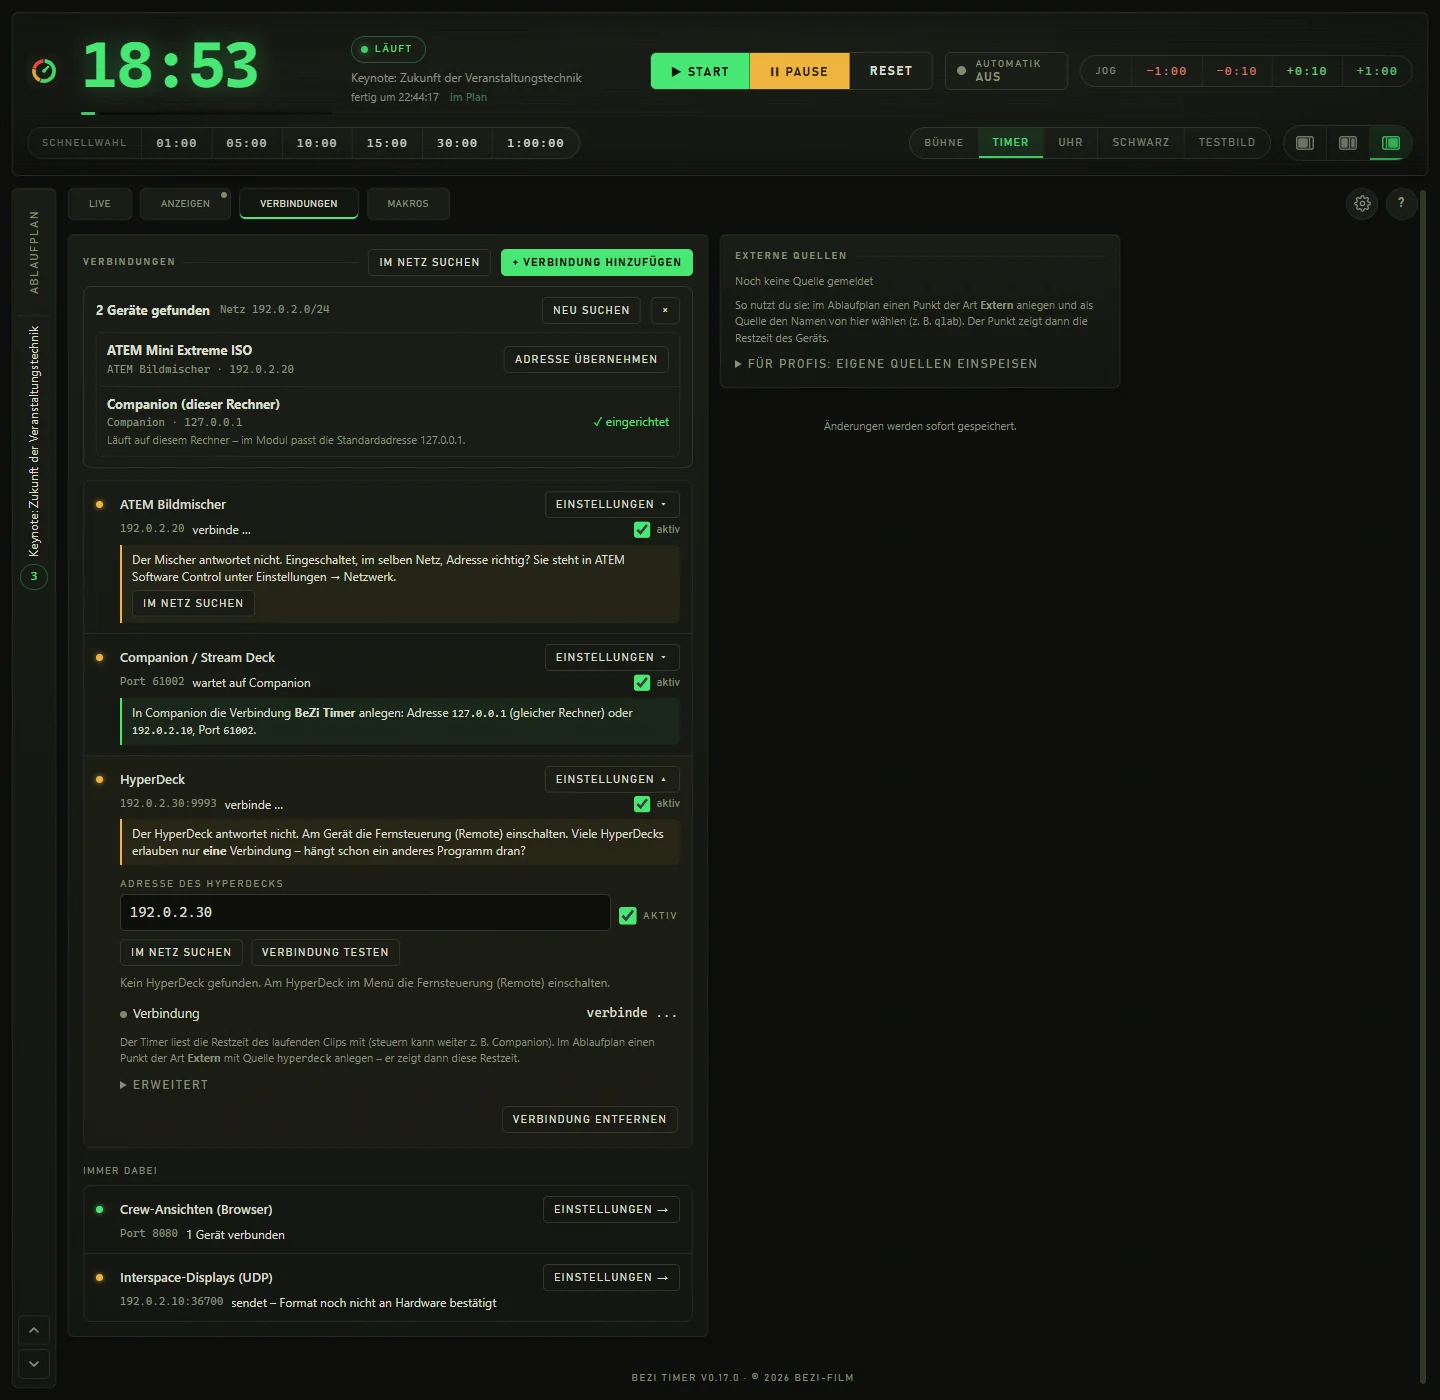
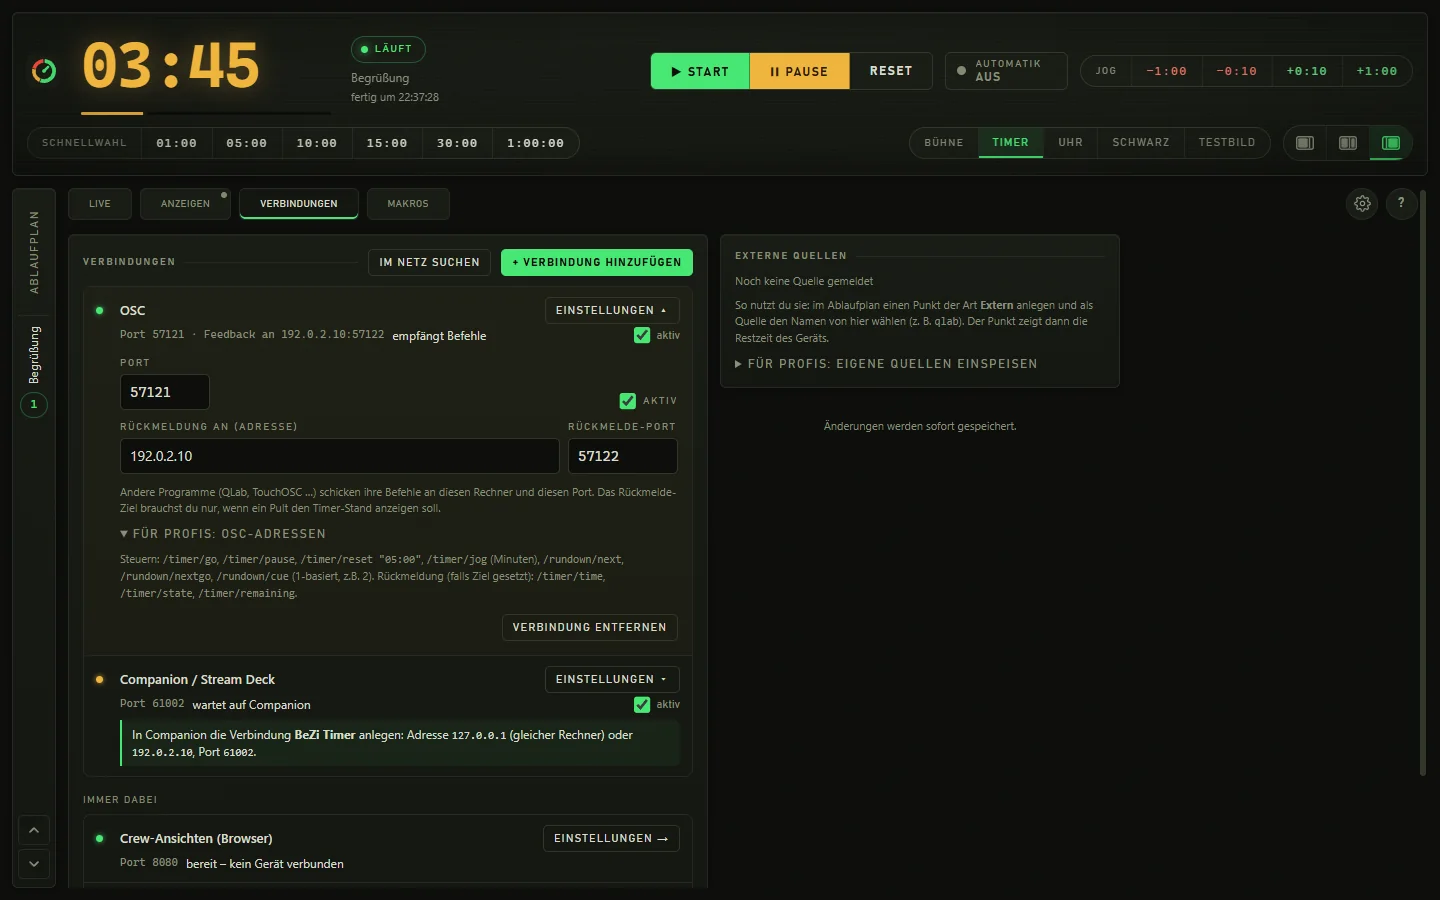
All the devices and systems the timer talks to, in one list – as in Companion. Each row shows the status live and, below it, what is missing or what to do next. You never have to type in anything the timer can find itself.
All devices in one list with live status, search and hints.
Connection list with live status
Each row shows the name, status (connected, waiting, error), address and a switch. “Settings” expands the details right below the row. Crew views and Interspace displays appear as fixed rows under “Always included”. “Remove” turns the connection off; the entered values are kept.
Open the “Connections” tab, expand a row with “Settings”.
Search the network
Finds ATEM switchers (with model name), HyperDecks, QLab, Companion and PowerPoint computers on your own network within seconds. One click on “Add” creates the connection and enters the address. If you create a connection without an address, the search runs automatically; the hits appear as suggestions under the address field. The search runs only on click and is read-only – nothing changes on the device.
Click “Search network” in the card header or in the row of the connection in question, then “Add” on a hit.
Test connection
For ATEM, QLab, HyperDeck and PowerPoint computers: instead of “doesn’t work”, the timer tells you why – for example that OSC access has to be allowed in QLab, or that the HyperDeck is already connected to another program. If the timer is already connected, the test doesn’t open a second connection.
Click “Test connection” in the connection; the result appears next to it.
Every row says what’s missing
Below the row it says what is still to do: “No address yet” with a search button, “The switcher isn’t responding” with the way to find the address in the switcher, or the next step (“choose a source on the item”, “create an external item with source qlab”). Companion shows address and port to copy, step by step.
Nothing to set up.
Add a connection
Instead of cards for third-party systems you may never need, you choose at the top what should play along: Companion, OSC, QLab, HyperDeck, PowerPoint, ATEM. A fresh installation starts out tidy that way.
“+ Add connection” → choose a device → enter the address or let the timer search, check “active”.
External sources
The card shows external time sources with their current remaining time (for example qlab, hyperdeck, powerpoint). An external item in the rundown with that source then shows the time on all displays. Your own systems (Mitti, scripts) feed in their remaining time via OSC /external/NAME/remaining or HTTP /api/external/NAME?remaining=….
Create an item of type “External” in the rundown and choose the name from here as the source.
Port errors made understandable
If a port can’t be opened, the log says why – including the note that Windows reserves entire port ranges for Hyper-V and WSL, which can include a default port. In that case, a different port in the connection in question helps.
“Live” tab → read the “System log”; change the port in the connection.
Backup timer: a second computer as a stand-in
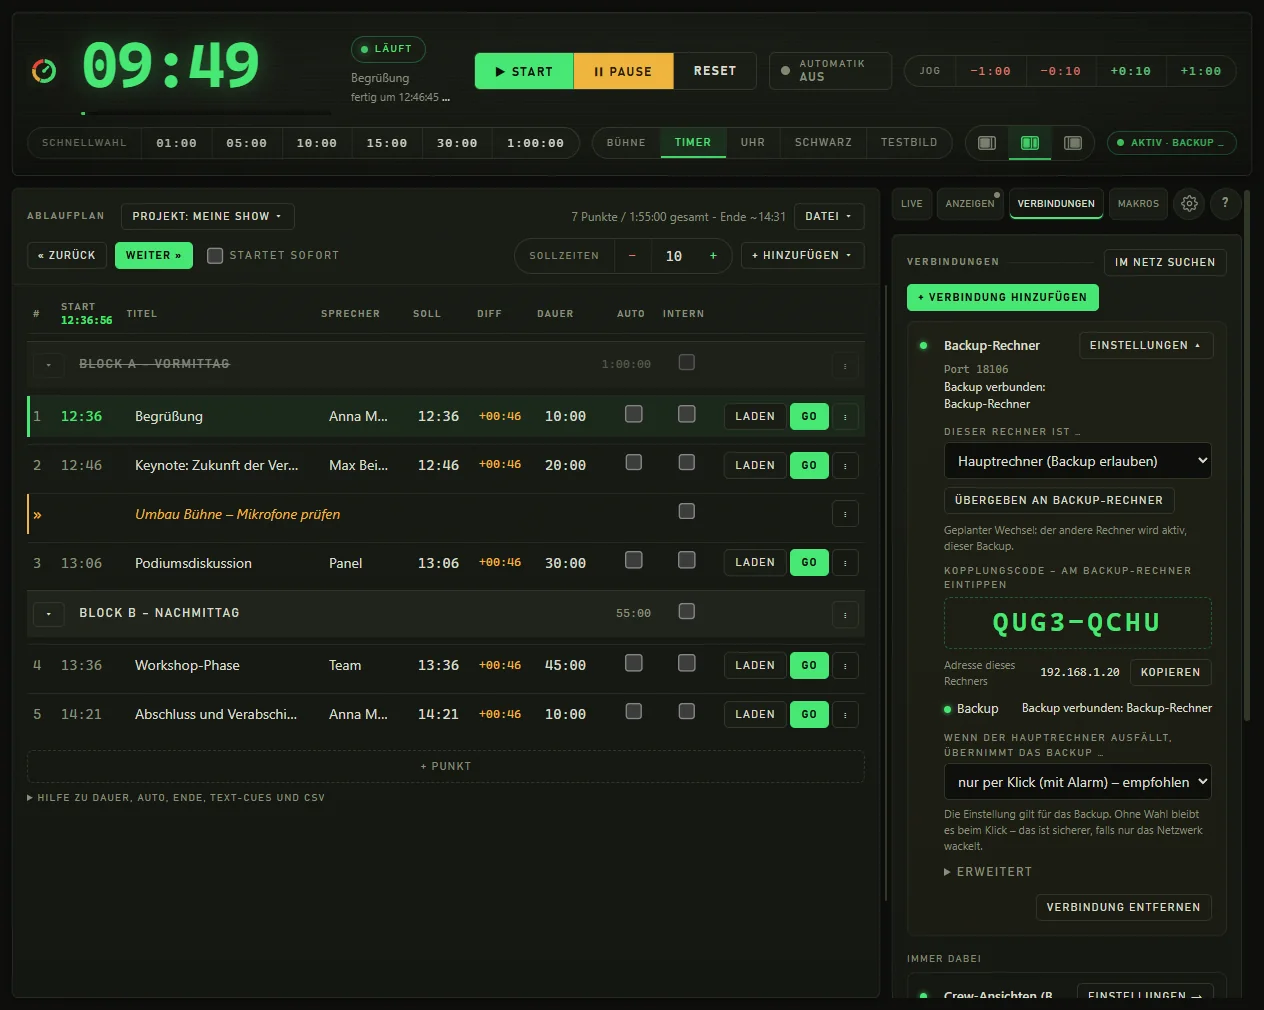
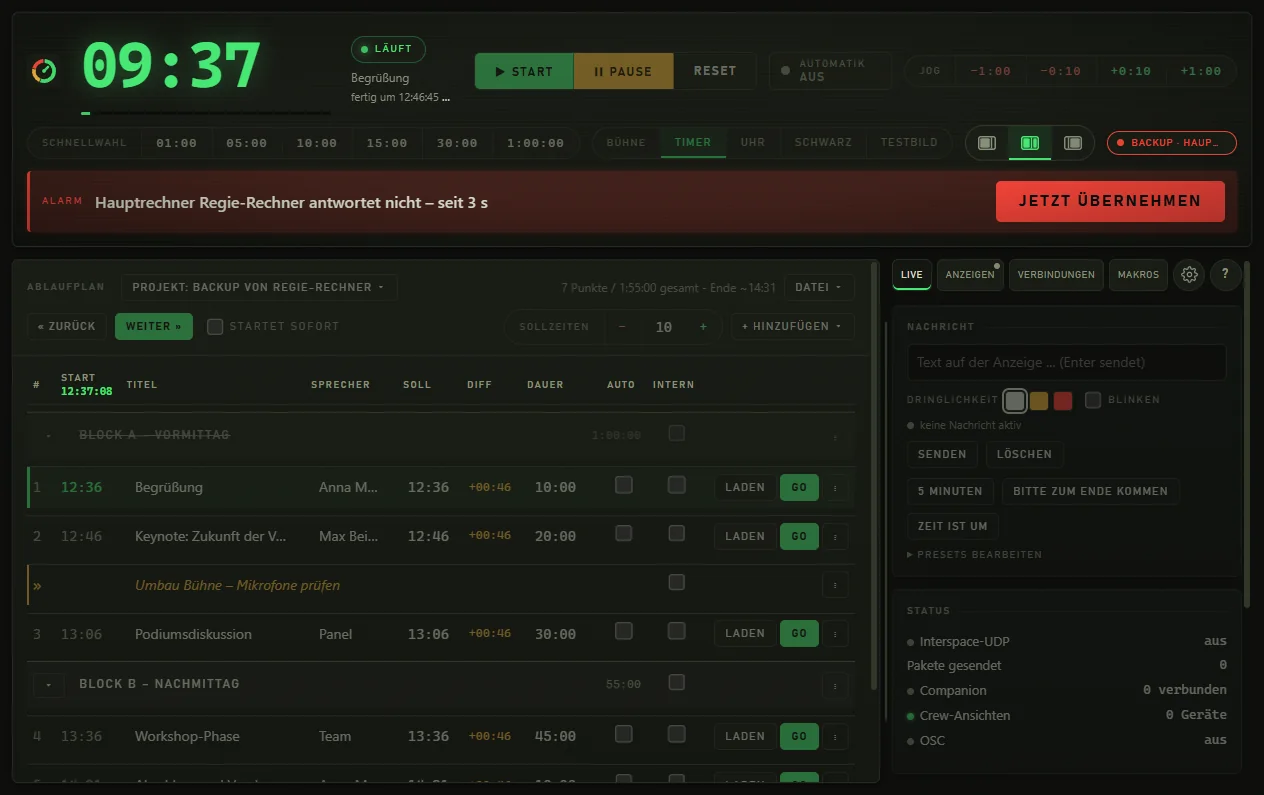
Since version 0.18.0, a second BeZi Timer can run along as a stand-in. Two computers on the same network: one is active and controls everything, the other mirrors it live and steps in if the main computer fails. That way a show stays on track even if the computer in the control room crashes.
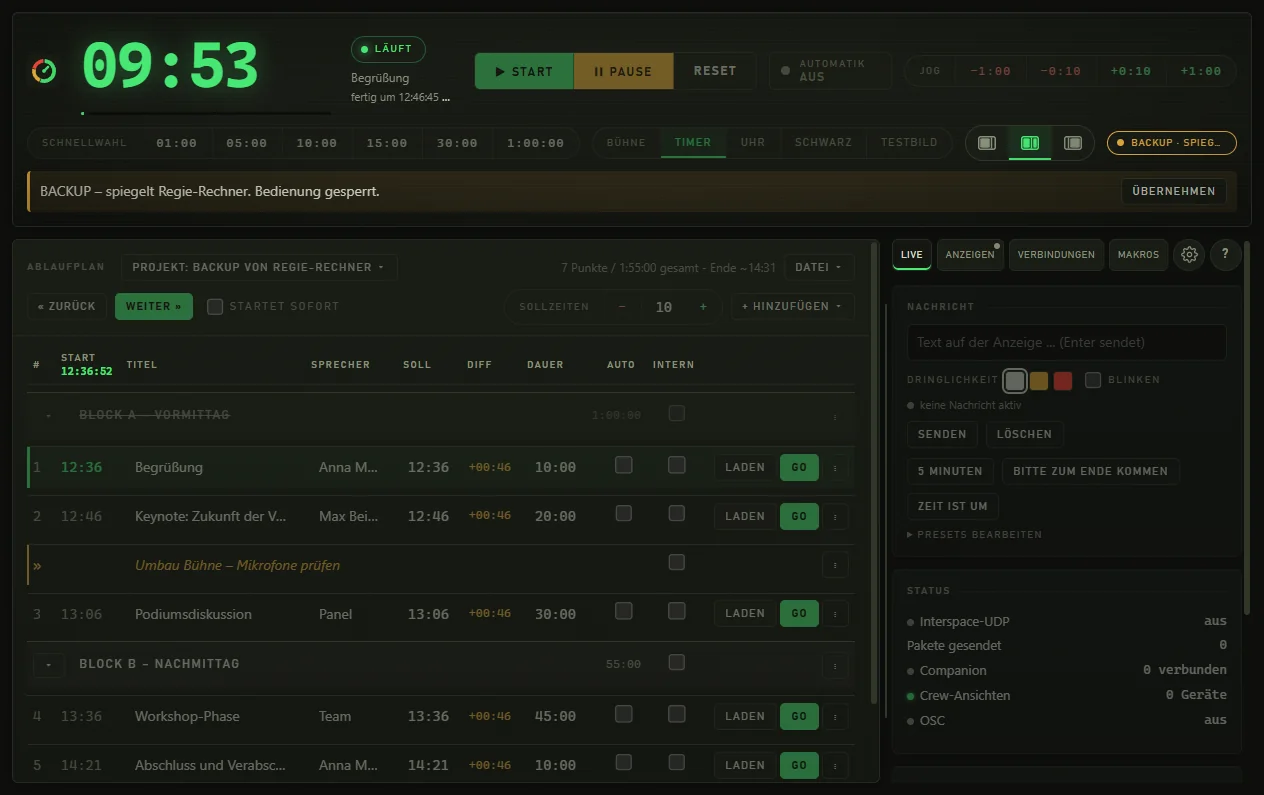
On the main computer: the “Backup computer” card with pairing code, address and the choice of how the backup takes over.On the backup: time and rundown run along live, controls are locked (yellow banner, “BACKUP · mirroring” badge).If the main computer fails, the backup raises the alarm. One click on “Take over now” and the timer keeps running.
Two computers, exactly one in control
The active computer controls everything: ATEM, macros, Companion, OSC, PowerPoint and Interspace. The backup mirrors live: time, rundown, loaded item, messages, macros and the device settings. But it never sends anything to external devices and can't be operated. That way two computers can never switch at the same time.
“Connections” tab → “Backup computer”.
Tip: For the second computer there is the second license at 50% off (see “Price & license”).
Pairing without IP addresses
You don't have to type in any addresses. The main computer shows a pairing code like K7QM-4TXD, and the second computer finds it on the network and pairs with it.
On the main computer, choose “Main computer (allow backup)”. The timer shows the pairing code.
On the second computer, choose “Backup for another computer”.
Click “Find main computer on the network” and click the main computer.
Type in the code and click “Pair”. Done.
Alarm on failure
If the main computer stops responding, the backup raises the alarm after about 2 seconds: a red, pulsing banner, a warning sound (can be turned off) and the big “Take over now” button. One click is enough. The timer keeps running seamlessly, and the triggers of the running item don't fire again; so the ATEM doesn't switch a second time.
On the backup, click “Take over now” or press Ctrl+Shift+Ü.
Tip: If you like, the backup can also take over by itself, after 3, 5 or 10 seconds. You set this on the main computer.
Roles at a glance
A badge in the header shows which role you are in right now: “ACTIVE · Backup ✓”, “ACTIVE · Backup missing” or “BACKUP · mirroring …”. On the backup there is also a banner “BACKUP – mirroring … Controls locked” with the “Take over” button. It takes two clicks so that it can't be triggered by accident.
Planned switch and return
“Hand over to …” hands control to the other computer as planned. When a crashed main computer comes back, it recognizes that the backup has taken over, becomes the backup itself and shows a notice. It switches nothing until that is sorted out (start lock of 3 seconds at most).
On the active computer, choose “Hand over to …”.
Crew views and Companion follow by themselves
The browser views (stage, backstage, rundown, clock, dashboard, control page) jump to the active computer on failure. You see the same view with the same name and the same rotation. The Companion module has a new field “Backup-Rechner (optional)” (backup computer). If there is a failure (longer than 2 seconds) or if the main computer reports itself as passive, the module connects to the other computer, and later switches back again.
Tip: The variable $(bezi-timer:role) shows which computer is currently being controlled. The “Backup-Rechner wird gesteuert” feedback (backup computer in control) colors the button.
PowerPoint sharing file with both addresses
With a paired backup, a newly created sharing file contains the addresses of both computers, with the main computer first. The timer that is passive at the moment rejects the file, so it connects to the active one.
“Connections” tab → “PowerPoint” → create the file again.
Tip: An older file knows only one address. Create it again after pairing.
What is stored on the backup computer
The backup keeps the main computer's state in a project of its own, “Backup of <Name>”. The backup computer's own projects are left untouched.
Requirements and firewall
Both computers need the same program version. The first time, the Windows firewall asks whether BeZi Timer may accept connections: “Allow access” (private network). The default port is 18006 (TCP and UDP). If it is in use or reserved by Windows, the card explains in plain language how to fix it.
To set a different port: “Backup computer” card → “Advanced” → “Port”.
Companion and Stream Deck
BeZi Timer can be connected to Bitfocus Companion in both directions: the Stream Deck controls the timer and shows the countdown, and the timer in turn presses buttons in Companion. There is a dedicated Companion module you can download for this.
Install the Companion module
The dedicated “BeZi Timer” module comes with ready-made buttons, variables and feedbacks. It is supplied as a ZIP with all dependencies bundled, so Node.js is not needed. Alternatively, the Irisdown module still works – but then the rundown buttons and extra info are missing.
Unzip it and put the “bezi-timer” folder in a permanent location.
In Companion, under Settings, enter the parent folder as the “Developer modules path” and restart Companion.
Under “Connections”, add “BeZi Timer” and enter the host (this computer's address; on the same computer 127.0.0.1) and the port; the app's address and port can be copied from the Companion card.
Tip: The row in the app turns green as soon as Companion is connected. The default port can be changed in the card in case Windows has reserved it.
Ready-made buttons (presets)
In Companion's “Presets” tab there are ready-made buttons: GO, PAUSE, Start/Pause, RESET; −1 min, +1 min, −10 s, +10 s and a dial for jog (for the Stream Deck + with a rotary action); NEXT, NEXT + START, PREV, CUE 1–4; MAKRO 1–8; TIMER, CLOCK, BLACK, TEST and Clear message.
In Companion, choose a button → “Presets” → expand “BeZi Timer” → drag a preset onto the surface.
Tip: For the dial on the Stream Deck +: check “Enable Rotary Actions”, turn right = Jog +1, turn left = Jog −1.
Countdown display on the buttons
The “Countdown-Anzeige” (countdown display) category contains display buttons without an action, so that an accidental press during the show does nothing: hours, minutes, seconds individually (also with a label), minutes:seconds, full time, time + running item, next item, schedule offset (“on schedule”, “+1:35 over plan”) and position in the rundown (“3 / 12”). The background color follows the state: green is running, amber is paused, red is overtime.
Placing the three “(gross)” (large) buttons for hours, minutes and seconds next to each other gives you a studio clock across three buttons.
Actions, variables and feedbacks
All functions are available individually in the “Actions” tab: GO, pause, toggle start/pause, reset (with a custom time), jog in minutes and seconds, send message (with Companion variables), clear message, set display mode, load rundown item (CUE), load and start (CUEGO), next and previous item, load and start next item, and trigger macro. Variables such as time, time_mmss, state, duration, progress_percent, overtime and message_active are available, and through the web server also current_title, current_speaker, next_title, clock, plan_finish, plan_drift, rundown_position and more. Feedbacks color buttons for “Timer läuft” (timer running), “Timer pausiert” (paused), “Overtime”, display mode, message active and schedule offset, and draw a progress bar.
Write variables in buttons as $(bezi-timer:name).
For the text variables, the “Crew views” card (web server) must be active; the module has the web server port, and 0 turns this query off.
Tip: NEXT and PREV load the target item; whether it starts right away is decided by its Auto checkbox in the rundown or the “auto-start” checkbox.
Triggering buttons in Companion (reverse direction)
The timer can press buttons in Companion – in macros and at rundown items. “Read buttons” fetches all pages with their names, each button's image and what it does (for example “atem: Set Preview input”). Instead of typing page, row and column, you choose the button in a grid; “Press now (test)” tries it out. If TCP remote control is on in Companion, the button colors follow live. While reading, the timer briefly registers in Companion as the “BeZi Timer” surface; nothing is pressed in the process.
Connections → Companion → “Read buttons” (only on click), then “View buttons …”.
In the macro step or at the rundown item, “Companion” → “Choose button …” → click the button in the grid.
Another Companion computer and the ports are under “Advanced”.
Tip: You get all pages and live colors if TCP remote control is on in Companion under Settings → Protocols; otherwise only page 1 is read.
Irisdown-compatible protocol
The app speaks the Irisdown command set over TCP: VERSION, UPDATEMODE, UPDATES, GO, PAUSE, TOGGLEPAUSE, RESET (optionally with a time), JOG, MESSAGE, DISPLAY. There are also CUE, CUEGO, NEXT, NEXTGO, PREV and MACRO. The return channel reports time, state, display mode and message every second and on every change; in extended mode also the total duration for progress bars.
In Companion, as an alternative, create the “Irisdown: Countdown Timer” connection and enter the computer's address and port.
ATEM switcher
The timer talks to Blackmagic ATEM switchers directly, without a detour through Companion. A complete control panel is in its own “ATEM control” window, and the source is attached to the rundown item. The switcher is only operated when automation is armed – nothing happens when you talk through the plan.
Connect the ATEM
In the ATEM card you enter the switcher's address (or let the timer search for it), choose the M/E (M/E 1–4) and the transition at start (cut or auto transition as set on the switcher) and turn “active” on. Below that, the card shows live what is on Program and Preview.
The “ATEM ▣” button in the rundown header (or the Window → ATEM control menu) opens a control panel with a Program row and a Preview row showing the names from the switcher, Cut, Auto, Fade to Black, all keyers (USK and DSK) and the macros. One click in the Program row switches immediately with a hard cut; the Preview row sets up the next source.
Click the “ATEM ▣” button or press Ctrl+Shift+A (Mac: ⌘+Shift+A).
With several M/Es, choose the M/E at the top right.
Tip: A click in the Program row always switches immediately – on a live broadcast, take care not to click the wrong source by accident.
Switcher info and history
The window shows model, address, connection state, number of M/Es, current sources and all inputs with their numbers – the number is the value for the source at the rundown item. A history lists the latest actions with the time, errors in red.
“Switcher info” card at the bottom of the ATEM window.
Tip: If the connection is off or the address is missing, the window explains the next step at the top instead of showing an empty panel.
ATEM in macros and at the rundown item
As a macro step or at the rundown item, the following are available: Program, Preview, Cut, Auto transition, run macro, Fade to Black, DSK on/off and USK on/off – with names from the switcher. All switcher commands run in the order in which they were triggered, even with fast loading and GO.
Macro editor → “+ Step” → ATEM, or at the rundown item under ⋮ → ATEM switcher.
Live feedback and warning
The ▣ symbol before the title of an item with a video source takes its color from the real switcher state: red on Program, green on Preview. If an item with a video source is running and the switcher sends something else or can't be reached, a warning appears at the top after three seconds.
Nothing to set up; the warning only applies when automation is armed.
Commands by voice or text
In the ATEM window you also control timer and switcher with whole sentences: hold the microphone and speak, or type the command. Speech recognition runs entirely on the computer, and after the one-time setup everything works offline.
Commands by text or voice: type a sentence or hold the microphone.
Speak or type
Hold the microphone button (or Space) and speak, for example “Kamera zwei auf Programm”, “Makro Namenseinblendung”, “weiter” or “Schwarzblende” (commands are understood in German). Alternatively, you type the sentence into the field and click “Run”. If there are several microphones, you choose the one you want.
ATEM window → “Commands by voice or text” card → hold the microphone or type a sentence.
One-time setup
Speech recognition (Whisper) is set up with a click; the language model is around 250 MB and is only downloaded when you click. After that, recognition needs no internet.
Click “Set up speech recognition”.
Simple sentences instantly, free-form sentences via AI
The timer recognizes simple sentences instantly, without AI. Free-form phrasing is interpreted by the local AI (Ollama, as with the rundown import). This covers Program, Preview, Cut, Auto, Fade to Black, ATEM macros, keyer on/off, start, pause, next and previous item, load item and BeZi macros (“Makro Pause”; by voice, “Makro 3” means macro 3 on the switcher).
Speak or type a sentence; the field below says what was recognized.
Names are checked
The code checks spoken source and macro names against the switcher, including similar-sounding ones (a slightly misheard name is matched to the right macro). Anything that doesn't match clearly is not switched.
Nothing to set up.
Picture changes only after confirmation
Everything that changes the program picture is confirmed first: the dialog says “Understood: …”, Enter or “ja” runs it, Esc or “nein” discards it. If you don't want that, check “without confirmation” under the Program row – with a warning, because then a misheard command switches the live picture directly.
Confirm: Enter or “ja”; discard: Esc or “nein”.
Checkbox “Voice and text commands switch Program without confirmation” in the ATEM window.
Tip: Clicks in the Program row always switch immediately, regardless of the checkbox.
QLab, HyperDeck and external time sources
Video players deliver their remaining time to the timer, so that a video item in the rundown shows the real running time – and the timer can control them.
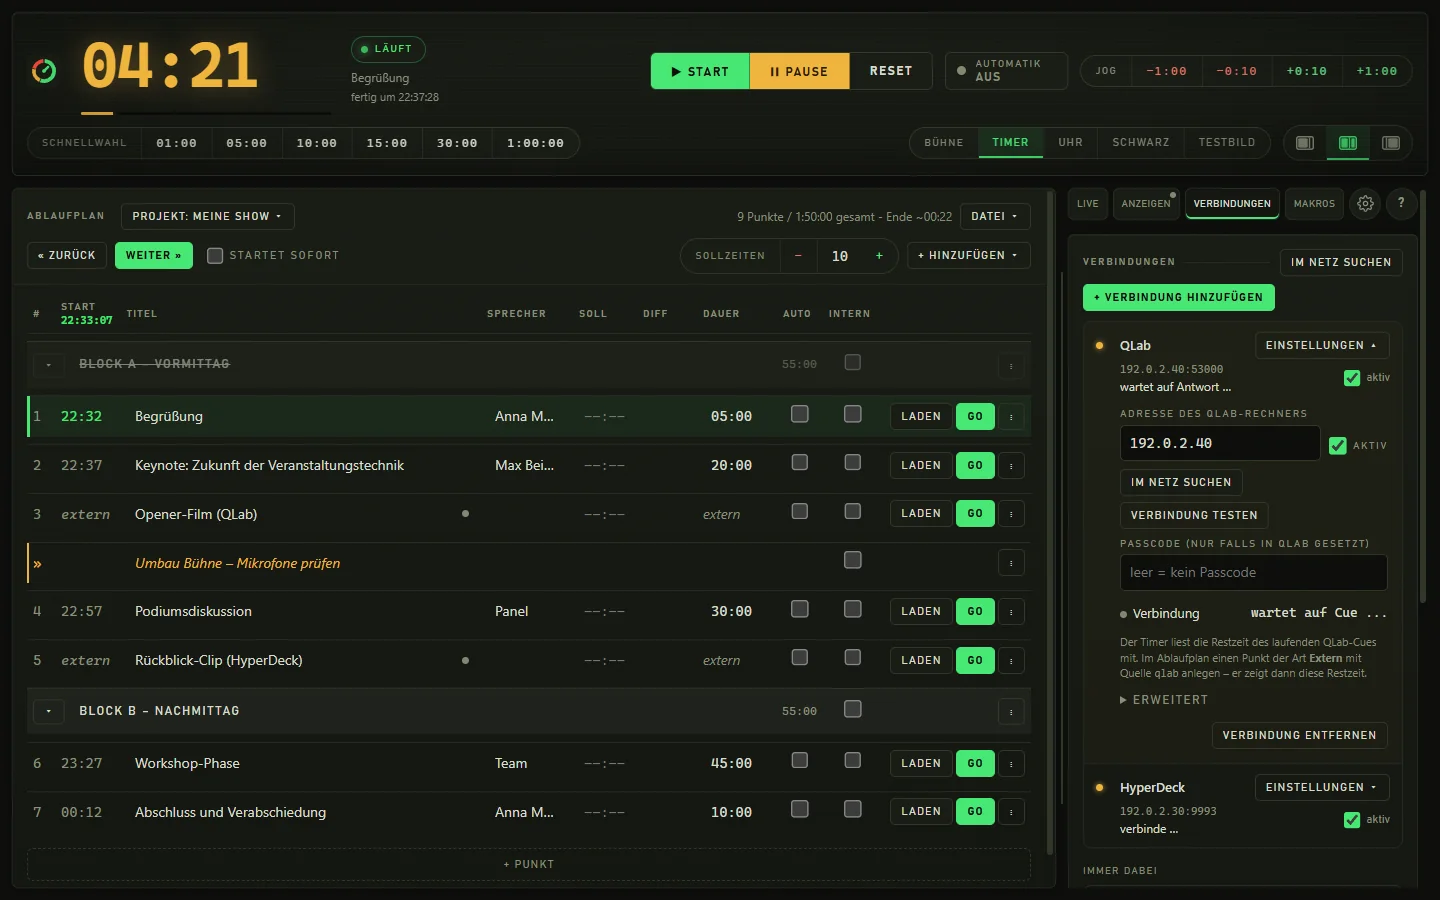
External items in the rundown and the QLab connection with address, test and passcode.
QLab: read remaining time
The timer queries the running QLab cue directly and feeds its remaining time in as the external source “qlab”. In the rundown, you create an external item with this source for that; it shows the cue's remaining time on all displays. If a passcode is set in QLab, you enter it in the connection.
Connections → “+ Add connection” → QLab, “Search network” or enter the address, check “active”.
“Test connection” tells you whether OSC access needs to be allowed in QLab.
In the rundown: “+ Add” → External → ⋮ → source qlab.
Control QLab
QLab commands are available in macros and at rundown items: GO, stop all, pause all, resume, panic (soft fade out), reset workspace, as well as start cue, stop cue and playhead to cue (with the cue number). They run over the existing connection.
Macro editor → “+ Step” → QLab, or at the rundown item ⋮ → “+ Connection” → QLab.
HyperDeck: read remaining time
The timer follows the remaining time of the running HyperDeck clip while, for example, Companion keeps controlling. The source is called “hyperdeck” by default. Many HyperDecks allow only one control connection; the test reports this clearly (“busy”).
Connections → “+ Add connection” → HyperDeck → search for or enter the address, “active”.
In the rundown, an external item with the source hyperdeck.
Control HyperDeck
Commands for macros and rundown items: play, stop, record, next and previous clip, choose clip (with the clip number). They use the existing connection – important, because the HyperDeck often allows only one.
Macro step “HyperDeck” or at the rundown item ⋮ → “+ Connection” → HyperDeck.
Your own sources via OSC or HTTP
Other systems (Mitti, custom scripts) report their remaining time via OSC /external/NAME/remaining (seconds) or HTTP /api/external/NAME?remaining=… (optionally duration and label). The name matches the source name at the external item. If a source reports nothing for more than three seconds, it is considered failed.
Create an external item in the rundown and enter the name as the source.
Control and follow PowerPoint
The timer controls presentations and follows the slide number – on this computer or on a separate presentation computer. Works on Windows and macOS.
Control slides
“PowerPoint” step for macros and rundown items: slide forward and back, jump to slide N, start show (from slide) and end it, black and black off, open presentation. At the rundown item, “Open file” is fully prepared: open the presentation on load and, if you like, get it ready as a show right away.
At the rundown item: ⋮ → “+ Connection” → PowerPoint → “+ Function …”.
In the macro editor: “+ Step” → PowerPoint → choose the command, choose the file with “Choose file …”.
Tip: PowerPoint is never started just to query it and is never quit; presentations the timer didn't open are never closed. It is only started with “Open” and “Start show”.
Slide number live in the timer
The “PowerPoint” Live card shows “7 / 32”, the slide title and “Next: …” and has buttons for Back, Next, Black and Start/end show. They can always be operated by hand, even without armed automation.
“Live” tab → “PowerPoint” card (appears as soon as the connection is created).
Slide number on stage
If you like, the slide number appears discreetly at the bottom center of the stage display and the Stage crew view – only while a show is running.
Connections → PowerPoint → checkbox “Also show the slide number on the stage display”.
Video in the slide as a time source
If a video is playing on the slide, PowerPoint delivers its remaining time to an external item with the source “powerpoint” – as with QLab and HyperDeck.
Create an external item in the rundown, source powerpoint.
Separate presentation computer
On the computer with PowerPoint, you start a second BeZi Timer and turn on “Share PowerPoint” (with an access key if you like). On the main computer, you choose “On another computer” or “Search network” – the timer finds the helper by itself. Through sharing, only files that are stored on the presentation computer can be opened (no network paths, no macro files); .pptx, .ppsx, .ppt and .pps are allowed.
Presentation computer: Connections → PowerPoint → check “Share this computer”, note down the address and port.
Main computer: Connections → PowerPoint → “Where is PowerPoint running?” → “On another computer”, enter or search for the address, “Test connection”.
Tip: Without an access key, any device on the network may control this PowerPoint – usually fine on a studio network, better with a key on a guest network.
BeZi macros
A macro is a chain of steps that run one after another. You click them together in the editor, give them a name and a color, and trigger them with a click, at a rundown item, via Companion, OSC, HTTP or voice. Macros are stored on the computer (the venue), not in the show project.
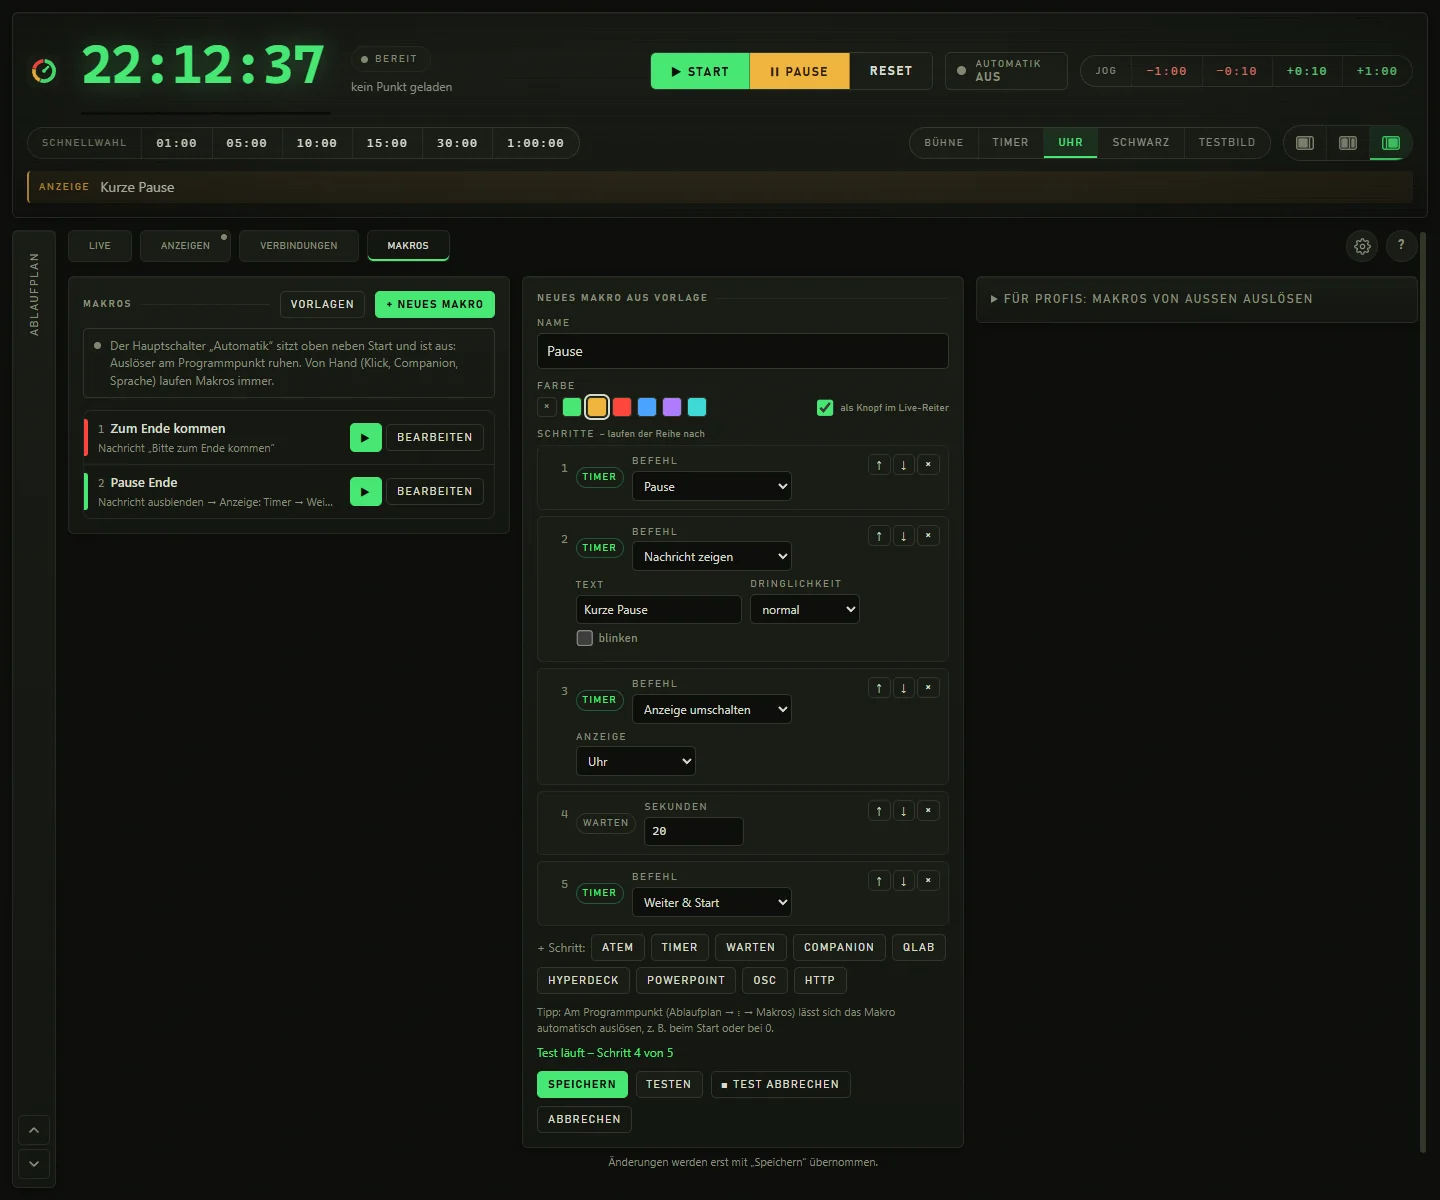
The macro editor: click steps together and test right away.
Macro editor
In the “Macros” tab you create a macro with “+ New macro”: name (up to 40 characters), color and, optionally, the checkbox “as a button in the Live tab”. Then you add steps at the bottom. What is still missing is shown right at the step (“Choose source”). It is only saved when you click “Save”.
“Cancel” discards the draft, “Delete” removes the macro.
Nine kinds of steps
ATEM (source, cut, auto, macro, keyer, Fade to Black), Timer (start, pause, set time, extend/shorten time, next, next & start, back, message, display), Wait (for example “2” or “1:30” seconds), Companion (press button), QLab, HyperDeck, PowerPoint, OSC (address, arguments, destination) and HTTP (GET or POST with a JSON body).
Click the kind under “+ Step:” and fill in the fields.
With OSC, leave “Destination” empty to use the destination address of the OSC connection.
Tip: If a step fails, the rest still keeps running.
Templates for a quick start
Five ready-made templates to adapt: “Pause” (pause the timer, message “Short break”, show the clock), “End break” (clear message, timer display, next item and start), “Please wrap up” (red, flashing message), and – with an ATEM set up – “Speaker change” (camera to Program with a smooth transition, wait 2 s, name lower third) and “Closing” (Fade to Black, display black, pause the timer).
“Macros” tab → “Templates” → click a template, then adapt it in the editor and save.
Test before saving
“Test” runs the draft immediately, even if unsaved. The progress shows “Step 2 of 5”, and a button cancels the test.
Click “Test” in the editor; “■ Cancel test” stops it.
Tip: Don't run ATEM steps in tests as long as the picture on the output must not change.
Fixed macro number
Every macro has a fixed number that appears before the name. It stays the same when other macros are deleted or reordered, so that, for example, the Companion button “MAKRO 3” always triggers the same thing.
Read the number in the macro list; you can rearrange the display order without changing the numbers.
Trigger them however it suits you
By click in the Live tab (with progress and cancel), at a rundown item with a trigger (on load, on start, at remaining time, at 0 …), via Companion (action “Makro auslösen” (trigger macro), buttons MAKRO 1–8), via OSC /macro 2 or /macro “Pause”, via HTTP /api/macro?m=2 and by voice in the ATEM window (“Makro Pause”). At a rundown item, macros only run when automation is armed; by hand and from outside, they always run.
Check “as a button in the Live tab” in the editor to get a button.
At the rundown item: ⋮ → “+ Connection” → Macros.
Tip: Like a click, macros triggered from outside always run, even when automation isn't “armed” – like GO and NEXT, TCP and OSC have no login; the HTTP interface is protected by the operator password.
Protection against double starts and loops
A double click does not start a macro twice. A macro that would continue endlessly via “Next” is stopped. Turning automation off also stops automatically triggered macros that are still waiting.
Nothing to set up.
Old actions become macros
On first start, the timer automatically converts automation actions from earlier versions into one-step macros; all triggers in existing rundowns keep working. They only appear as a button in the Live tab once you turn that on in the macro.
Nothing to do.
Show log
The timer automatically records when each item actually ran and how far it overran – the basis for the debrief.
The show log: real times and deviation per item.
Automatic recording
For each item that has run, the log shows title, start time, actual duration and the deviation from the planned duration (+/−). The deviation is green up to +30 seconds, amber up to +5 minutes and red above that. An item that is currently running is shown as “running”. The data survives restarting the app; it belongs to the project.
“Live” tab → “Show log” card.
Canceled items
If the app is quit or crashes in the middle of an item, the item then appears as “canceled” in the log – also in the CSV export – and the new run is recorded cleanly. There are no made-up times: whatever wasn't measured stays empty.
Nothing to set up.
Export CSV and clear
“Export CSV” saves the log as a table with the columns Title, Plan, Start, End, Planned, Actual and Deviation (semicolon-separated, opens directly in Excel). “clear” deletes all entries.
“Show log” card → “Export CSV” or “clear”.
Remote control: HTTP, OSC and TCP
Besides Companion, the timer can be controlled from outside through three open interfaces. All of them run locally on the network, without a cloud.
Remote control: OSC with port, feedback and addresses; below it, the TCP port for Companion and the web port of the crew views.
HTTP API
The web server accepts commands as HTTP calls: /api/go, /api/pause, /api/toggle, /api/reset (optionally with ?time=), /api/jog (?minutes= or ?seconds=), /api/message?text=…, /api/message/clear, /api/display?mode=TIMER|CLOCK|BLACK|TEST, /api/next, /api/nextgo, /api/prev, /api/cue?n=… and /api/macro?m=…. /api/status returns the entire state as JSON. With an operator password set, the control commands require a token.
“Crew views” card: set the port and password; send calls, for example, from a Stream Deck button or script.
OSC control and feedback
With OSC active, QLab, TouchOSC and others control the timer: /timer/go, /timer/pause, /timer/toggle, /timer/reset (optionally with a time), /timer/jog (minutes), /timer/jog/seconds, /timer/message, /timer/message/clear, /timer/display, /rundown/next, /rundown/nextgo, /rundown/prev, /rundown/cue (1-based) and /macro. A feedback target delivers /timer/time, /timer/state and /timer/remaining if a console is meant to show the state. OSC is off by default.
Connections → “+ Add connection” → OSC → port, “active”; feedback address and port only if needed.
The addresses are in the card under “For experts: OSC addresses”.
TCP protocol for Companion
The TCP server speaks the Irisdown command set including CUE, CUEGO, NEXT, NEXTGO, PREV and MACRO (details in the Companion section). The port is shown in the Companion card and can be changed.
Connections → Companion → port, “active”.
Settings, help and updates
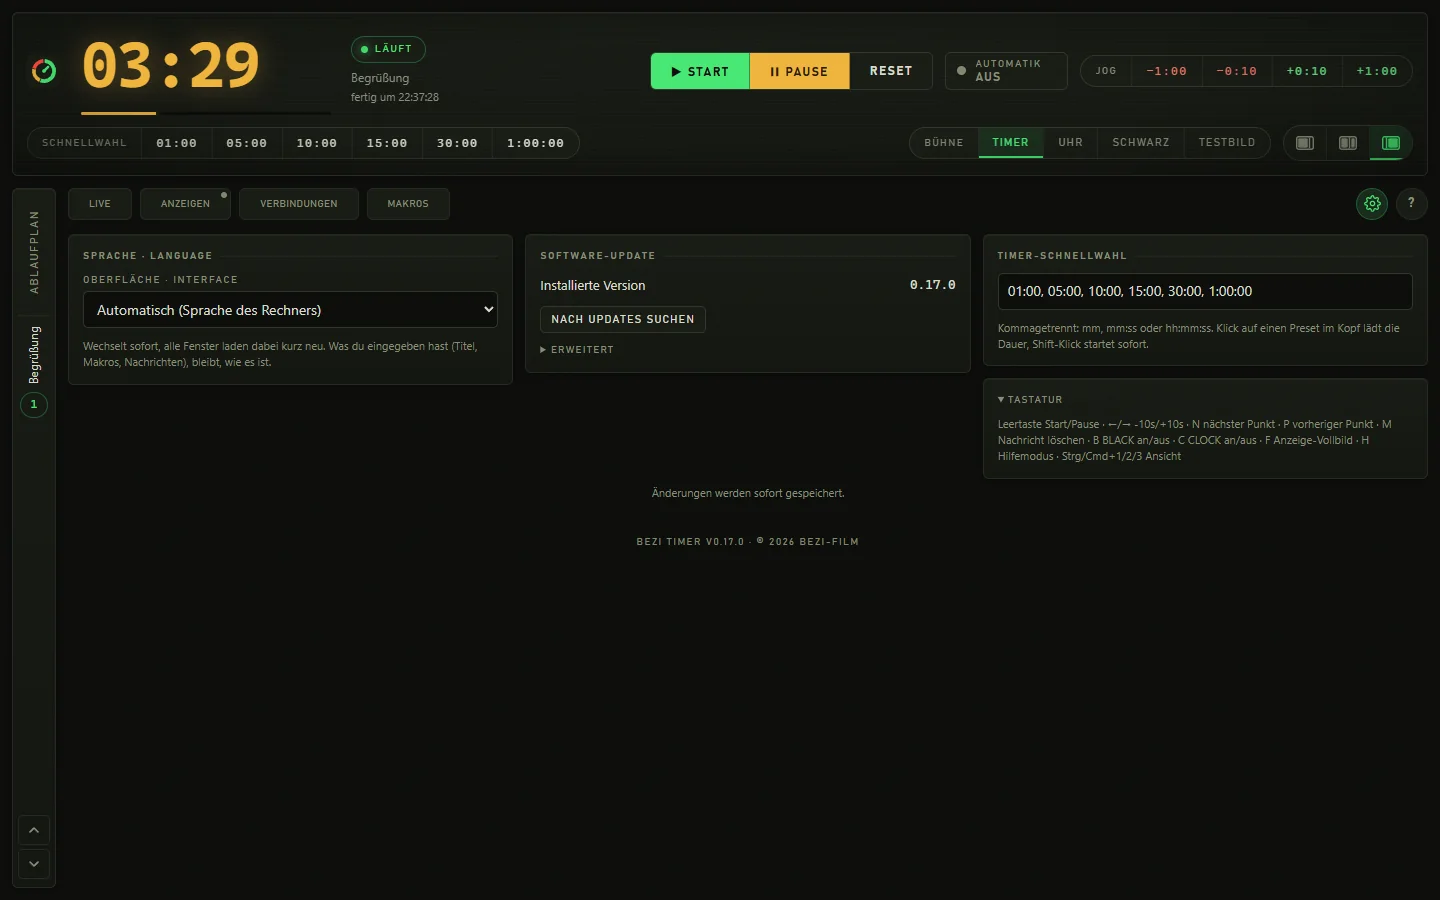
The gear next to the help button opens the app's own settings: language, software update, quick select times and keyboard shortcuts. A green dot on the gear shows that an update is available.
The settings: language, update, quick select and keyboard shortcuts.
Interface language
The interface is available in German and English. “Automatic” uses the computer's language. The change applies to the operator window, ATEM window, stage display, dashboard editor, menu and the crew views in the browser; all windows briefly reload in the process. What you entered yourself (titles, speakers, messages, macro names, names from the switcher) stays as it is. More languages can be added as language files, without changing the app.
Gear → “Sprache · Language” → choose the interface language.
Tip: The card is deliberately bilingual, so that the way back is always readable.
Software update
The app quietly checks for a new version at startup; if it finds one, a notice at the bottom left tells you, but doesn't push you into anything. One click asks whether to download. On Windows, the update then downloads and installs itself – always only on click, never in the middle of a show. On macOS, the download opens in the browser, and the DMG is installed by hand.
Gear → “Software update” → “Check for updates” for a manual check; the installed version is shown above it.
Hide the notice at the bottom left with ×; a dot on the gear remains.
Timer quick select
Here you set which durations appear as quick select buttons in the header – comma-separated as mm, mm:ss or hh:mm:ss. The values belong to the project.
Gear → “Timer quick select”.
Help mode
The ? button (or the H key) turns on a help mode: when you move the mouse over an area, a panel at the bottom right explains what it does. The mode never changes any state, and everything stays fully usable.
Turn it on and off with the H key or “?”; Esc ends the mode.
All keyboard shortcuts in one place
The “Keyboard” card in the settings lists all shortcuts (see the table below). They work as long as no input field is active.
Gear → expand “Keyboard”.
Keyboard shortcuts
Key
Effect
Space
Toggle Start/Pause (in the main window, as long as no input field is active)
← / →
Shift time by −10 s or +10 s (Jog)
N
Load next item (with the “auto-start” checkbox in the plan header, it also starts)
P
Load previous item
M
Clear message
B
Stage display black on/off
C
Stage display clock on/off
F
Toggle display window fullscreen
F11
Toggle display window fullscreen (Window menu)
H
Help mode on/off
Ctrl/⌘ + 1 / 2 / 3
Switch view: Rundown only / Split / Side panel only
Ctrl/⌘ + Shift + A
Open ATEM control
Enter (in the message field)
Send message
Shift + click on quick select
Load duration and start immediately
Double-click on plan row
Load item into the timer
Double-click on display window
Toggle fullscreen
Hold Space (ATEM window)
Record from the microphone for a voice command
Enter / Esc (voice command)
Execute or discard the recognized switch
← / → / Home / End / Enter (divider focused)
Adjust the width of the right column in fine steps, to minimum, to maximum, to default width
Esc
Close menus, QR code, help mode and dialogs
Integrations
Bitfocus Companion / Stream Deck
Dedicated Companion module “BeZi Timer” with actions, variables, feedbacks and ready-made buttons (transport, jog with rotary knob, rundown, macros, countdown displays). Setup: download the module ZIP from the Companion card, unzip it, enter the parent folder in Companion as “Developer modules path”, restart Companion, create the connection “BeZi Timer”. Conversely, the timer can read in and press Companion buttons. The Irisdown module also works as an alternative.
Blackmagic ATEM
Direct control of ATEM switchers: program, preview, cut, auto, macros, fade to black, upstream and downstream keyers, video source per item, control panel in its own window, live feedback and voice commands. Set up via “Search network” or the switcher’s address in the ATEM card; switching only happens when automation is armed.
QLab
Reads the remaining time of the running cue as an external source and controls QLab (GO, stop, pause, panic, start cue and more). Setup: allow OSC access in QLab (the connection test points this out), create a QLab connection in the timer and enter the passcode if there is one.
Blackmagic HyperDeck
Reads the remaining time of the running clip and controls play, stop, record and clip selection. Set up via “Search network” or the address; many devices only allow one control connection, and the timer shares its connection with the macros.
Microsoft PowerPoint
Control slides, read slide number and title, open a presentation, use video remaining time as a time source. Runs locally or on a presentation computer with a second BeZi Timer (“Share PowerPoint”, optionally with an access key).
OSC
Control by QLab, TouchOSC and others via addresses like /timer/go, /rundown/next or /macro, with optional feedback of the timer status. Macros can also send OSC messages to other devices. Off by default.
HTTP
Control API under /api/… and status query /api/status for your own scripts and buttons; macros and items can in turn trigger HTTP calls (GET or POST with JSON). Protected by the operator password.
Interspace displays
UDP output to network displays with the “Interspace BCD” encoder or a freely definable pattern. The timer picks the matching network by itself.
Local AI (Ollama) and speech recognition (Whisper)
Ollama reads rundowns and interprets free-form voice commands; speech recognition runs locally in the timer. Both work without internet; models are downloaded once on click.
Import & export
Import
Rundown via File → “Open rundown …” (JSON file from this app, for example an earlier “Save as”).
Import rundown (AI): .docx, .xlsx, .pdf, .csv, .txt – drag the file into the window or choose it via the File menu; the local AI recognizes items, speakers, times and durations, and clean tables work without AI.
Paste text (for example from an email) in the AI dialog.
Import CSV: columns Titel;Sprecher;Dauer;Soll;Auto, header row optional, separator is detected; items are appended to the plan.
Read in Companion buttons: pages, button images and descriptions from Bitfocus Companion.
Logo image for the dashboard (PNG, JPG, SVG).
Export
Show log as CSV (title, planned time, start, end, planned duration, actual duration, deviation) for the debrief and Excel.
Rundown as a JSON file via “Save as …”.
Project as a .bezishow file to take to another computer.
Status as JSON via /api/status for your own analyses.
Requirements
Windows 10/11 or macOS (Apple Silicon, M1 or newer); there is currently no download for Intel Macs and Linux. The Windows version installs without administrator rights; on the Mac you remove the quarantine flag once (instructions with the download).
One computer for the operator; for the stage monitor, a second screen or projector on the same computer.
Crew devices (tablets, phones, laptops, smart TVs with a browser) on the same network as the computer – no Wi-Fi client isolation.
For ATEM, HyperDeck, QLab, Companion and PowerPoint computers: reachable on the same network; confirm the firewall permission on first start.
For hardware displays: Interspace numeric display with CDEther receiver on the same network as the computer.
Bitfocus Companion 3.x for the dedicated module as per the module instructions (app version 0.10 or later); the button integration was tested with Companion 5.
For AI import: Ollama with a language model (the app downloads the suitable model for your RAM by itself).
For voice commands: about 250 MB once for the speech model; a microphone on the operator computer.
Screen size: the main window cannot be dragged narrower than 1100 px.
For the backup timer: a second computer on the same network with the same app version; port 18006 (TCP and UDP) and the firewall permission on the private network.
Price & license
Download the trial and try BeZi Timer at your leisure for 14 days of use: a day counts as soon as you start the timer on that day. After that it runs in demo mode: without restrictions, only with a watermark. The license is a one-time payment: no subscription, no account, no internet needed.
Runs completely locally and offline, even in a venue without internet
Questions and requests directly by email to the developer
Options
Second license (backup computer for the control room)50% off
Upgrade to version 2.050% off for existing customers
The trial period counts in days of use, not calendar days: a day counts as soon as you start the timer on that day. After 14 days of use, it runs in demo mode without restrictions, only with a watermark. You can download the trial without signing up.
The prices shown are planned launch prices and may still change before sales open.
The email notification is non-binding and does not obligate you to buy.
For some integrations (see “Good to know”), real-hardware testing is still pending.
FAQ
Do I have to let the app access the internet?
No. Timer, web server, crew views, AI import and speech recognition all run locally on the computer and on your own network. Only the update check and the one-time download of models need internet.
How do I get the display onto the second monitor?
In the “Displays” tab, choose the screen under “Monitor”, open “Display window” and click “move there”. With the “Fullscreen on start” checkbox it will set itself up automatically in the future; double-click or the F key toggles fullscreen.
What does the “Auto” checkbox do?
When an item with the checkbox set reaches zero, the timer automatically loads and starts the next item. An end action (message, clock, black), if set, fires beforehand.
What is the difference between “load” and “GO”?
“load” only puts the item on the timer – on an ATEM, the video source moves to preview. “GO” loads and starts immediately, and the source goes to program.
Why does the switcher do nothing even though I entered a video source?
The “Automation” master switch in the header is off. Without armed automation, the timer deliberately does not touch the switcher. Arm it (second click), or use the “Arm” button on the item.
Do macros also run when automation is off?
Macros triggered by hand – click in the Live tab, Companion, OSC, HTTP, voice – always run. The triggers on the item (on load, on start, at remaining time …) only run when automation is armed.
The crew link doesn’t work – what’s the cause?
The device must be on the same network as the timer computer, and the crew views must be active. Also check that the network has no device isolation and that the firewall allows the port.
Can the timer also be operated from a phone?
Yes: set an operator password under “Displays”, and you get the control page /operator with Start, Pause, Reset, Jog, plan list and messages. Without a password, the page is off.
How do I import an existing rundown?
Drag the Word, Excel, PDF or text file into the window, check the preview and append it. For Excel tables with the columns Titel;Sprecher;Dauer;Soll;Auto, “Import CSV” also works without AI.
Why doesn’t the AI read my scanned PDF?
Pure scans contain no readable text. Use a PDF with real text or re-save the document from Word or Excel.
According to the log, my Companion port is in use by the system – what do I do?
Windows reserves whole port ranges for Hyper-V and WSL, which can include the default port. Enter a different port in the Companion card and set the same number in the Companion module.
How do I build a custom view for the client?
Under “Displays”, in the “Crew views” card, click the gear next to /custom. In the dashboard editor, add building blocks such as countdown, logo and free text, arrange and scale them; /custom shows the result live. Internal items stay invisible.
How do I switch a crew device remotely?
In the “Devices” card, every device with an open crew page appears. In the dropdown next to it you choose a different view or rotation – the device switches immediately.
How do I plan several events?
Via the project menu at the top left of the plan. Each project has its own rundown, dashboard, presets and log; the technical setup stays unchanged when you switch. With “Export …” you take a project along as a .bezishow file.
Why can’t I hear the gong?
Enable the alert tone under “Displays” and click anywhere in the window once – only then is the app allowed to play sound. The sound only plays on the operator computer.
What happens if the main computer fails in the middle of the show?
The backup sounds the alarm after about 2 seconds. With “Take over now” (or automatically after 3, 5 or 10 seconds, if you set it up that way), the timer carries on seamlessly. The triggers of the running item do not fire a second time.
Does the backup also switch anything while the main computer is running?
No. The backup only mirrors and never switches anything externally. It also can’t be operated. That way, two computers can never control ATEM, macros, Companion, OSC, PowerPoint or Interspace at the same time.
Do I need a separate license for the second computer?
For the backup computer there is a second license at 50% off, see “Price & license”.
How long does the trial last, and what happens afterward?
The trial period counts in days of use, not calendar days: a day counts as soon as you start the timer on that day. After 14 days of use, BeZi Timer runs in demo mode. All features remain available, with no restrictions, only a watermark. With the license (one-time payment, no subscription), the watermark goes away.
Versions
v0.18.0
Backup timer: a second BeZi Timer on the same network mirrors live and can take over on failure, by click or automatically after 3, 5 or 10 seconds.
Setup without IP addresses via a pairing code; alarm with warning tone after about 2 seconds of failure.
Role badges in the header, planned switchover (“Hand over to …”) and safe return of a crashed main computer.
Crew views and the Companion module switch to the active computer by themselves on failure; new variable $(bezi-timer:role) and new feedback.
The PowerPoint share file contains the addresses of both computers when a backup is paired.
v0.17.0
ATEM directly in the plan: live feedback (▣ red on program, green on preview), warning on deviation, ATEM macro per item and a dedicated control panel window with program/preview row, keyers, macros and switcher info.
Commands by voice or text in the ATEM window, with local speech recognition; source changes always ask for confirmation.
BeZi macros: a dedicated tab, editor with nine step types, templates, fixed numbers, triggering by click, item, Companion, OSC, HTTP and voice.
“auto-start” option for “next »” and the command NEXTGO; “NEXT + START” button in the Companion module.
Connections as a list with live status, as in Companion; “Search network” and “Test connection”; each row tells you what is missing.
Select Companion buttons by image and trigger them from the timer; control QLab and HyperDeck directly.
Control and monitor PowerPoint, including on a dedicated presentation computer.
Interface in English and further languages via file; three views of the main window; tidied header with a fixed grid and the “Automation” master switch; set up local AI with one click.
v0.16.0
Import rundown via local AI from Word, Excel, PDF and text; clean tables without AI.
Control ATEM video switchers directly: video source per item (preview on load, program on start) and ATEM actions with triggers.
New column “Diff”: deviation from the planned time per item, also in the rundown board for the crew.
Confirmation prompt before quitting while the timer is running.
v0.15.1
If the app is quit in the middle of an item, it appears in the show log as “canceled” instead of with made-up times; a new run is logged cleanly again.
v0.15.0
The start column is based on actual progress: times shift accordingly, and the expected end moves with them.
The same times in the Rundown crew view.
The Interspace output picks its network by itself by default and sends to the matching subnet broadcast.
v0.14.2
The display window is a secondary window: it only opens at start if you set it that way.
If you close the main window, the display and dashboard editor close with it, and all servers stop.
v0.14.1
GO now also starts external items (QLab, Mitti, custom scripts) and thereby triggers their automations.
v0.14.0
Plan header stays in view when scrolling; insert items in the middle of the plan; shift planned times together.
Color marker per item, groups with totals and collapsing, double-click loads an item.
Messages with urgency (normal, urgent, immediate) and blinking, with preview.
Automations: trigger OSC, HTTP or a Companion button when an item starts, with triggers and an “armed” switch.
Count-up for items that count upward from 0; devices can be labeled.
v0.13.0
Update notice at the bottom left that doesn’t nag.
Tabs organized by task: Live, Displays, Connections, Program.
Connections are created instead of predefined; download the Companion module directly from the app.
Show countdown: an item counts down to the next planned time in the plan.
Good to know
Interspace: only the “Interspace BCD” encoder is verified, on a real Interspace numeric display with CDEther receiver (countdown, color zones, blinking overtime, time of day). The encoders “ASCII hh:mm:ss + CR” and “STX + mmss + ETX” are marked as unverified assumptions, and “Custom pattern” depends on the format of the respective display. Pause is not signaled to the display (the time simply stands still), black and test pattern send nothing.
ATEM: switching (preview, program via cut and auto transition, reading macros) was tested on an ATEM Mini Extreme ISO according to the development docs. Larger switchers with multiple M/Es are provided for in the code but not explicitly documented on real hardware.
Voice control: sentence recognition and name matching were tested with a synthetic voice and text commands; recognition quality in a loud hall depends on microphone and room. It understands German sentences; the names from the switcher stay untranslated.
QLab and HyperDeck: for the new switching steps (version 0.17), the development docs note no real-hardware test; reading the remaining time has been in use since earlier versions.
PowerPoint: tested on Windows with a real PowerPoint 16; the macOS integration (via AppleScript) is untested because no Mac was available.
Companion reverse direction: reading in the buttons was tested read-only against a real Companion 5. Pressing buttons and the live colors depend on Companion’s HTTP and remote control interfaces; the internal interface used for the action description comes with no guarantee – if it goes away, the buttons’ image, text and color remain.
The dedicated Companion module is described for Companion 3.x; special cases of newer Companion versions are not documented individually.
macOS: the app is not signed with an Apple developer certificate; after installation the quarantine flag must be removed once. Auto-updates exist only on Windows; on the Mac, the new DMG is installed by hand.
Import formats: old Office formats (.doc, .xls), Pages, Numbers and RTF as well as scanned PDFs without text are not read. AI import needs Ollama with a language model, which the app downloads by itself the first time.
Interface languages: German and English; further languages are only prepared as a file mechanism.
Network security: the TCP and OSC interfaces have no login, like GO and NEXT; the control API and the control page are protected by the operator password. The crew views themselves are read-only but reachable without a login – only run them on trusted networks.
Macros and technical settings belong to the computer and not to the show project; they do not travel with a .bezishow file.
This guide describes version 0.18.0, the current download.